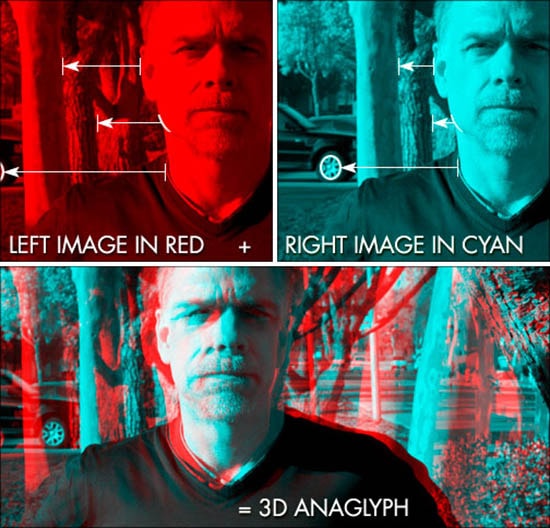
How to Create 3D Stereoscopic Effect in Photoshop
Here, you will learn on how to create 3D stereoscopic effect in Photoshop. You will need three images with different poses by the model. I hope it will help you both the beginner and advanced level of students in a great deal.
Create a new layer and shape up the size to A4. Make sure that it sets to portrait and resolution to 150 pixels. Choose the foreground color to ‘f7e8c1.’ Use the ‘Paint Bucket Tool’ to fill the canvas. Now, select first image. Go to Image> Mode and select Gray-scale. Again go to Image> Mode> but this time select ‘Duo-tone.’ In the type options, type ‘Monotone.’ Select the color from there. In this case, select ‘3d1f01.’ Now, drag this photo to the new layer that needs to be saved before working on to those images. Press Ctrl + G to group that layer. Name the group to ‘Pose 1.’ Press Ctrl + T to free transform. Press Shift and Alt and enlarge it by selecting top left or right side of the image. Next, add some blending mode over this layer. Change the layer mode to ‘Multiply.’ Add adjustment layer onto this. Make sure you have layer selected, not the group. From the adjustment layer, select ‘Levels.’ Be sure you click the left round button from below. Make some adjustments as you require for your image.
Photo Courtesy – http://www.photoshopsupport.com/
Turn the focus on the second image. Do the same as previously. Go to Image> Mode and select Gray-scale. Again go to Image> Mode> but this time select ‘Duo-tone.’ In the type options, type ‘Monotone.’ Select the color from there. In this case, select ‘00e7ff.’ After dragging the second image to saved layer and grouping it, rename it to ‘Pose 2.’ Follow the same procedure as previously done. Now, for the last time, select the third and last image. Do the same as previously. Go to Image> Mode and select Gray-scale. Again go to Image> Mode> but this time select Duo-tone. In the type options, type ‘Monotone.’ Select the color from there. In this case, select ‘ee0b78.’ Other things will remain the same. It will give you 3D stereoscopic effect in Photoshop. That sums up the whole process.
I hope that it will help you and from now on, hopefully you will follow this procedure more often in Photoshop and be an expert in this field in the future.
Here, you will learn on how to create a color splash effect with photo edit option in Photoshop. I hope it will help you the beginner level of students in a great deal. Photo Courtesy … Continue reading How to Create a Color Splash Effect in Photoshop
Read More
Here, you will learn on how to create layer texture look effect in Photoshop. I hope it will help you both the beginner and advanced level of students in a great deal. Photo Courtesy – https://www.youtube.com/watch?v=jIGvaM1r6vc … Continue reading How to Create Layer Texture Look Effect in Photoshop
Read More