How to Create Realistic Water Reflection Effect in Photoshop
Here, you will learn on how to create a realistic water reflection effect in Photoshop. Hopefully this tutorial will help both the beginners and advanced level of students in a great deal.
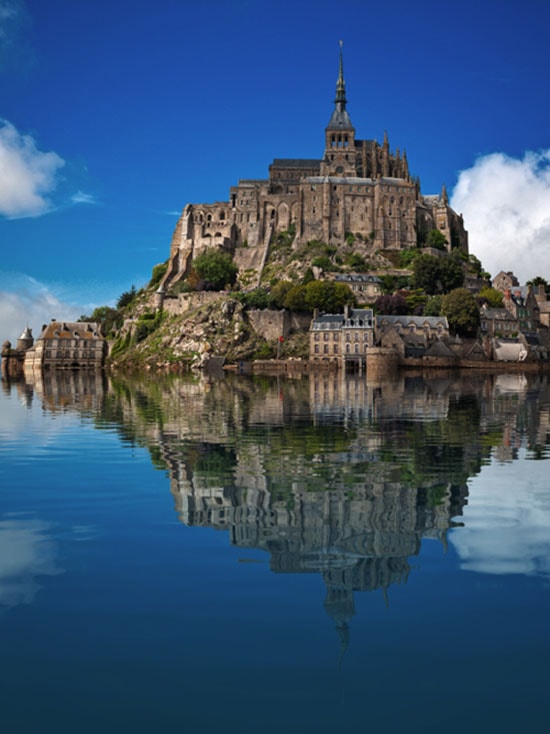
Open the image that you want to work on and adjust the image size window to fill the image. Duplicate the background layer by pressing Ctrl + J. Name this layer “Reflection”. Now increase the canvas size which looks good on your image. Click on the “Reflection” layer in order to make it active and press Ctrl + T to enter Free Transform. Right click on the image and choose “Flip Vertical” and press Enter. While “Reflection” layer still selected, select the Move Tool and click and drag down while holding Shift in order to move the layer downwards. Now we need to create some waves. To do that, a special texture resembling waves is needed which we will apply on the reflection layer. Create a new document of 4000 x 4000 px. Go to Filter> Noise> Add Noise to add noise and make adjustments on the settings. Apply a 5px Gaussian blur by going to Filter> Blur> Gaussian Blur. Now, choose Image> Adjustments> Curves and drag the sliders on the left and right towards the spike. Apply a 35px Motion Blur by going to Filter> Blur> Motion Blur in order to achieve smoother and extended waves. New let’s transform this waves texture to achieve the same perspective as in our document. Press Ctrl + T to enter Free transform. Reduce the height of the texture to fit the bottom half of the image. Make sure the upper bounds of the texture layer don’t exceed the upper bounds of the “Reflection” layer.
Photo Courtesy – http://10steps.sg/
Now, Ctrl+click on the “Reflection” layer to create a selection of its pixels. Duplicate the selection while on the texture layer. Name this new layer “Texture” and delete the previous layer (Layer1). Right-click on the “Texture” layer and from the drop down menu, choose Duplicate Layer and set the destination as a new document. Close the texture document and go back to our original document. Turn off the visibility of the “Texture” layer. Right-click on the “Reflection” layer in the layers palette and from the drop down menu, choose Convert to Smart Object. Water has a certain reflective quality and our reflection lacks this quality. Remember Turn on the visibility of “Texture” layer and change its blending mode to Soft Light and lower the Opacity. Select the color of the water now by creating a new layer and fill the layer with the foreground color. Name this layer ‘Color.’ Move the “Color” layer below the “Texture” layer. Clip the “Color” layer to the “Reflection” layer by holding Alt key and clicking right in between the two layers in the layers palette. Press D to reset to default colors and X to switch between them. Add a layer mask to the “Color” layer by choosing Layer> Layer Mask> Reveal All. Select the Gradient Tool and select Foreground to Background option from the upper option bar.
Click on the layer mask and with the Gradient Tool still selected, hold the Shift key and drag downwards. Lower the Opacity of the “Color” layer to 12%. That ends the whole process. In this way, you can photo edit and create this realistic effect. Hope that helps!
Today we are going to talk about destructive vs nondestructive editing in Photoshop. It is hugely important topic to understand but fortunately it’s also simple. A destructive verse nondestructive edit simply means either you are … Continue reading Destructive and Non-destructive Editing in Photoshop
Read MoreMost magazines and newspapers are trying to use the female models across the globe whose neck is lengthy. If they do not find those models, they are trying to use artificial way of extending the … Continue reading How to ‘Lengthen the Neck’ in Photoshop
Read More