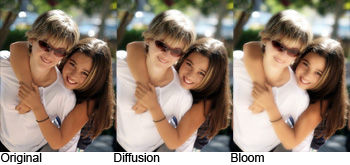
How to Create Bloom Effect in Photoshop
Here, you will learn on how to create bloom effect in Photohsop. It is also called hipster photo effect. I hope it will help you both the beginner and advanced level of students in a great deal.
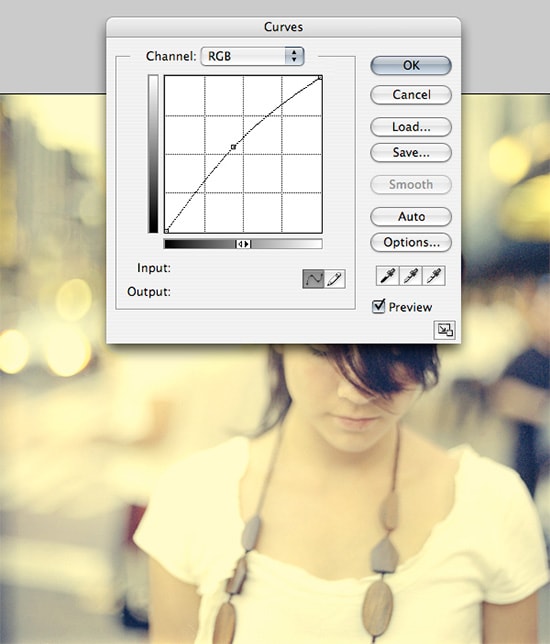
At first, open a photo in a Photoshop. The photo should be in sunny outdoors as it is the best to apply this effect. Convert the layer to a Smart Object before applying any filters. Duplicate the layer and select the top layer. Go to Filter > Blur > Gaussian Blur and then select the radius that is best suited. Change the blending mode option to ‘Screen.’ It will do the job for you. However, if you want to go to the advanced level, you still have work to do because you will see glowing edges around the black areas. To fix this, delete the filter mask. Right click on the filter mask and then choose ‘Delete Filter Mask.’ Select ‘Blending Options’ and move the black input slider to the middle. While holding down the Alt key on your keyboard, click and drag the black input slider towards the very right and click OK. Now, the image looks much better.
I hope that it will help you and from now on, hopefully you will follow this procedure more often in Photoshop and be an expert in this field in the future.
Working with tabbed documents Let’s open three individual images in Photoshop. As you will see the three image will open in three different tabs. You can do it by dragging the selected three images from … Continue reading Photoshop Tips: Tweaking Your Documents Right
Read More
Hello Everyone! Today in this article we’ll learn about how you can resize lots of images fast in Photoshop. In my case, I have twelve images that are way too big for my needs. Most … Continue reading Resize multiple images quickly in Photoshop
Read More