How to “Correct the Color of Images” in 3 steps
In this tutorial, you will learn how to correct the color of the images in three easy steps. I hope it will help the beginner level students of Photoshop specially.
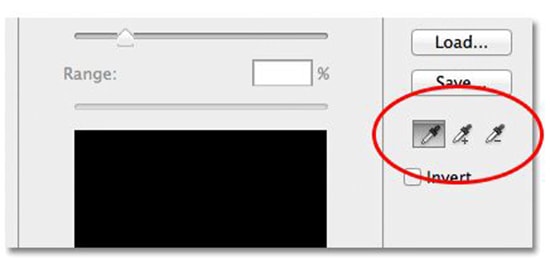
Photo Courtesy – http://www.photoshopessentials.com/
At first, select an image of your own choice. Make a layer. Suppose, you name that as background layer. Then, duplicate the layer. The duplicate layer name is background copy. After that, you need to go to the level and select an eyedropper tool from there. Then, select the white area of the image as you need to choose the white eyedropper tool. Next, you need to select the black eyedropper tool and select the black part of the image which is visible. If you see that the before and after of that particular image, you will see the certain changes of that image. Thus, you will get the three easy steps of correcting the color of any image.
This is a quick Photoshop tip tutorial on how to straighten crooked images. This is something that comes up fairly regularly in photography or regular Photoshop editing. I am glad to know this trick and … Continue reading How to Straighten a Crooked image in Photoshop
Read MorePhoto retouching is not easy. You have to make a person simply look better, without adding any unrealistic effects. The images or the pictures must look always be realistic. Everything must be looked perfect. Photo … Continue reading Natural to Extreme Photo Retouching
Read More