Usage of ‘Patch Tool’ in Photoshop
In this tutorial, you will get to know about the tool that is used for many purposes and one of the most important tools in Photoshop coined as the ‘patch tool.’ When you click on it, you will also see that ‘J’ is written beside the patch tool which tells you that it is also a shortcut form of the patch tool. There is a tool named ‘Type tool’ in Photoshop. When you click on that type tool, if you click ‘J,’ it will automatically take you to patch tool. I hope that it will be very helpful for all and for the beginners especially.
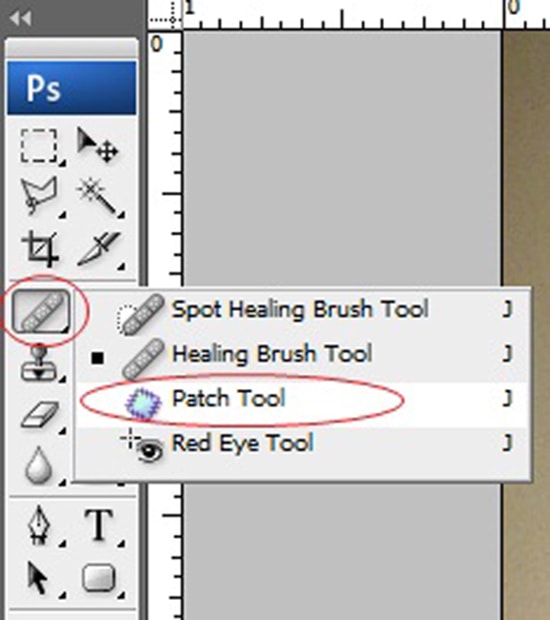
Not many people use the patch tool but they probably should. This patch tool is basically a healing brush with a selection that you have made instead of brushing. You are making a selection like the selection tool and then dragging it over where you want the effect to take place with. As it is a healing type, it should be under healing brush icon. Even your cursor will be changed due to that. Suppose, we are going to remove the wrinkles under the eyes. You can add a duplicate layer by commanding Ctrl + J and we are going to just select by click with hold and drag. Now, inside your selection, you just click and drag it out to where you want the texture effect to take place. You can also command Ctrl + D for deselect. It may do too much and hence, you can just need to go back to get your texture back in a bit more. It is just the removal of the opacity of that layer. Then. go back to layers pallet and reduce or adjust the opacity to get back some naturalness in the image. So, we just use the patch tool to reduce the amount of patches under the eyes especially any wrinkles or something like that.
Photo retouching means improve the quality of a photo. Photo retouching has many classifications. Product retouching is one of them. If a person wants a product to sell it whether in online or offline, product … Continue reading Basic idea for “Product Retouching’
Read More
Here, you will learn on how to blend multiple images with the edging techniques using Photoshop. You will get to know about how to use the edging technique to improve the blending of your Photoshop work. First … Continue reading How to Blend Multiple Images in Photoshop
Read More