How to Resize an image in Photoshop
In this tutorial, you will learn how to resize an image using Adobe Photoshop. Resizing an image in Adobe Photoshop is a fairly simple task. Hopefully, it will help the beginner level of students in a great way.

Photo Courtesy – http://www.makeuseof.com/
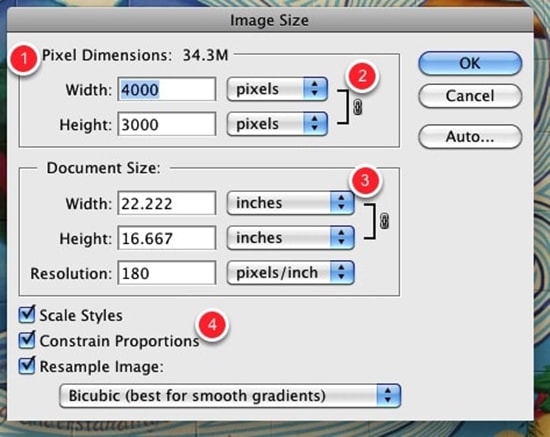
Open an image you would like to work on in Photoshop. Go to Image> Image Size. You will see that the number right next to “Pixel Dimensions” points out the size of your. Moreover, if you look below the image size, you will see that Photoshop displays the ‘Width’ and ‘Height’ of your image in pixels. When you resize an image, you will notice that the width and height of your image changes and as well as the size of your image. Now, resizing an image is pretty simple. All you have to do is enter the new dimensions in place of the old ones. So let’s say if I prefer to resize my image to one that is 600 pixels wide, all I have to do is type 600 in place of 1280(assumption); the same goes for the height.
If you look below at the bottom of the Image Size dialog box, you will notice that the Constrain Proportions checkbox has been activated by default. If you wish to give your image a custom width and height (one that is out of proportion by the way), you should uncheck the ‘Constrain Proportions’ dialog box and enter the desired values. You can change your image dimensions in ‘Percent’ as well. For example: 50 percent of the original width will result in a value of the image width which is half the original value.
There is always the question about picture quality. You cannot expect to enlarge your image to two times its original size, and expect to maintain the same picture quality. You will most definitely end up with a very blurry image. That is it. In this way, you can photo edit and resize the image. Hope that helps!
