How to Create Transparency Effects in Photoshop
Here, you will learn on how to create transparency effects in Photoshop. You must use mask in this method. I hope it will help you both the beginner level of students in a great deal.
Photo Courtesy – 1080plus.com
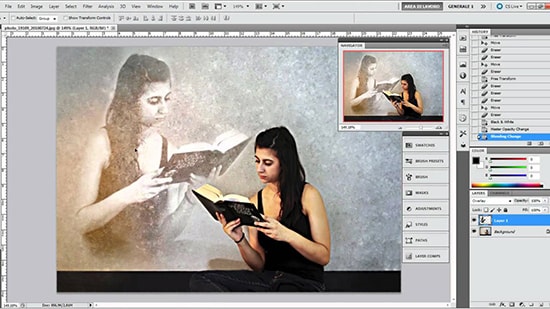
At first, select an image that you want to work with under a new layer. Duplicate the layer by clicking Ctrl + J. Take ‘move tool’ and press Ctrl + T to transform your photo. If you want to rotate the image, right click on your transform panel and right click ‘flip horizontal.’ Now, take ‘eraser tool’ and remove what you do not need. Try to be precise. It can be done with black background under this layer. Press Ctrl + T to transform your layer once again and enlarge it. Go to image> adjustments> black and white from the above toolbar. Make some necessary adjustments including adjusting the opacity as well. Change the blending modes from ‘normal’ to ‘overlay’ if you want. In this layer, add ‘vector mask.’ Select ‘gradient tool’ and create a soft gradient effect. Now, select layer but not mask. If you want, add a contrast from filter> Sharpen > Un-sharp mask and increase the radius. Once again, if you want try a nice effect with ‘blending options’ from layer style bar. Hold ‘Alt’ and click on a single cursor. That sums up the whole process.
I hope that it will help you and from now on, hopefully you will create more and more transparent effect images like this and be an expert in this field in the future.
Clipping mask is when you take out any image and you use it to fill the shape of an object. It’s like cutting a piece of paper and then adds something on it. To make … Continue reading Photoshop Clipping Mask Tutorial
Read MoreIn this tutorial, you will get to know about the tool that is used for many purposes and one of the most important tools in Photoshop coined as the ‘zoom tool.’ When you click on … Continue reading Usage of ‘Zoom tool’ in Photoshop
Read More