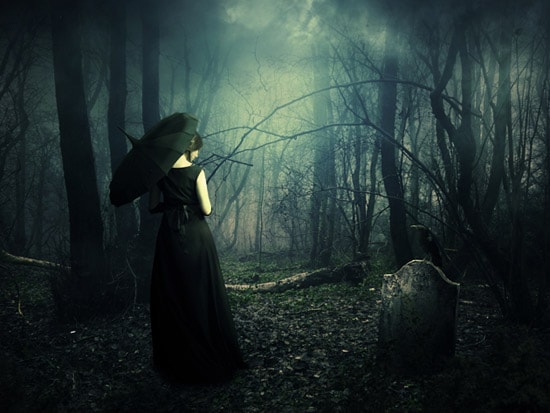
How to Create a Dark Photo Manipulation in Photoshop
Here, you will learn on how you can convert a forest into a dark, foggy, ominous scene. You will learn how to work with shadows, lighting, adjustment layers, layer masks, dodge and burning and much more. For this, you need the images of forest, sky and a model.
Photo Courtesy – http://www.tutorialized.com
Create a new document in Photoshop with the width of 3000 px and height of 2000 px. Open the forest stock photo. Use the Move Tool to drag it into a white canvas, resize it down using the Ctrl+T key. To turn the forest into a night scene, use an adjustment layer. Go to Layer > New Adjustment Layer > Gradient Map. To darken the forest more you can use a Curves adjustment layer. On this layer mask, use a basic, soft brush with black color. The opacity should be about 30-40% to reduce the dark effect of the center. In order to add more light to the forest, make a new layer and use a soft brush with the color #21bcbe to paint on the middle of the scene. Change the mode of this layer to Soft Light and opacity to 100%. Use another layer to make more light with a soft white brush. Set this layer mode to Soft Light 100%. Open the model stock image. Use your own method to isolate her from the background then place her on the path, near the foreground. Use a Photo Filter adjustment layer to add darker cyan to the model.
That will end the whole process. Hopefully, it helps all who wanted to create this kind of effect using Photoshop.
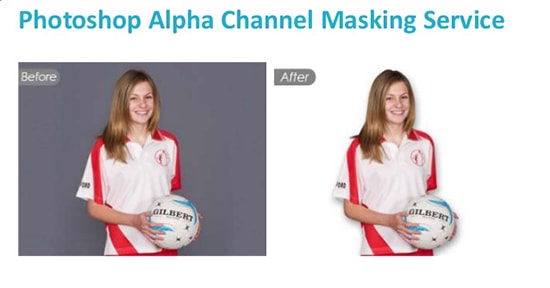
Here, you will learn on how to photo edit by creating Alpha Channel Masks effect in Photoshop. Therefore, we are going to work in the Alpha Channel. We are going to make use of Alpha Channel for masking. Courtesy – … Continue reading How to Create Alpha Channel Masks in Photoshop
Read MoreHere, you will learn about how to remove an image background through Photoshop. I hope that it will help the beginner level of Photoshop users especially. Photo Courtesy – http://onlinebusiness.about.com/ We can remove the background from … Continue reading How to ‘Remove Image Background’ in Photoshop
Read More