How to Create Dark Halloween Photo Manipulation Effect using Photoshop
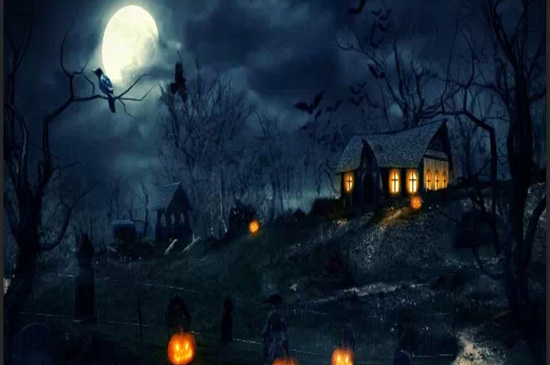
In this tutorial, you will learn how to create a dark Halloween photo manipulation effect using Photoshop. You will learn how to combine different stocks, create a dark and creepy atmosphere and work with lighting effect. For this, you need two gravestone images along with a pumpkin and smoke image. You also need an image of a crow and a few bats as well.
Create a new document in Photoshop with the 1500*1500 pixels. Open the forest stock. Drag it into our white canvas using the move tool and scale it down it to fit the document. To add some depth to the scene, go to Filter> Blur> Gaussian Blur and set the radius to 6 px. On the Filter Mask, use a basic soft brush with black color to erase the blur effect on the foreground. Open the gravestones image. I took two gravestones and place them in the ground. Apply Gaussian Blur with 3 px to the smaller one. Make all the gravestones layers selected and press Ctrl+G to create a group for them. Change the mode of this group from default group mode to normal 100%. Make a curve adjustment layer within this group to brighten the gravestones.
On this layer mask, use a soft black brush to erase the top right of the gravestones as it is illuminated by the light. Cut out the pumpkin and place it in the middle section of the ground. Make adjustments on Hue/Saturation and photo filter adjustment layer with clipping mask to reduce the saturation of the pumpkin a little. You can use curves to darken the pumpkin. On this layer mask, use a soft black brush to erase the top right to make some light there. Create four new layers on the top. Change the brush color to white and use the different brushes to paint around the pumpkin. Click the second button at the bottom of the layers panel to add a mask to two layers. Use a soft black brush to erase some unwanted details of the dust to get more natural result.
Open the smoke image. Isolate it from the background and put it over the working document. Add a mask to this layer and use a soft black brush to reduce the smoke intensity to get the result. Use the curves to darken the smoke effect. On this layer mask, use a soft black brush with the opacity about 20% to erase the foreground to make the effect there more visible. Isolate the crow and place him above the pumpkin. Make a new layer under the crow one. Use a soft black brush with the opacity about 50% to paint the shadow under the crow claws. Make another layer and use the same brush to paint more shadow of the crow on the pumpkin. Make adjustments on Hue/Saturation for this crow. Use the curve to darken the crow and on this layer mask, use a soft black brush to clear the dark effect on the upper right of the crow. Create a new layer and use a hard brush with the size about 8-9 px and with a red color. You can use #ff0000 to paint an evil eye for the crow.
Make three layers on the top. Paint with the bat brushes on each layer with black color. Lower the opacity of these bats to 40 and 50% to fit the foggy background. Apply Gaussian Blur with 3 px to these bat layers. Now, color the scene. Make a Gradient Map adjustment layer on the top. Change this layer mode to soft light with the opacity of 100%. Use color balance to add some cyan-blue to the scene. Create a photo filter adjustment layer on the top. On the top of the layer, use the Lasso tool to make a selection on the ground and set the feather radius for it to 60. Go to Layer> Adjustment Layer> Channel Mixer to do it. You can use a soft black brush to refine the red area to get the desired look. That should sum up the whole process.