
Blend Two Images In Photoshop
In this tutorial, I’m going to show you how to blend two images photographs together seamlessly. Sometimes it can be really, really easy to take two photographs, and then, blend them together, and just make a really nice transition. For this we will take help of masking to give it a nice look and blend the two photos smoothly.
So from the article Photoshop Layer Masks for Beginners we have seen how layer mask work. To review it, the way a layer mask works is, rather than erasing out the layer itself, what we do is we actually take a mask and put it on top of that layer, and then, we paint on to the mask. So when we cut out the mask, it cuts out that layer and shows the layer underneath, and the advantage of this is a mask is non-destructive. So, if we paint with black, it cuts it out and we see what’s underneath and when we paint with white; it covers it up again with the top layer.
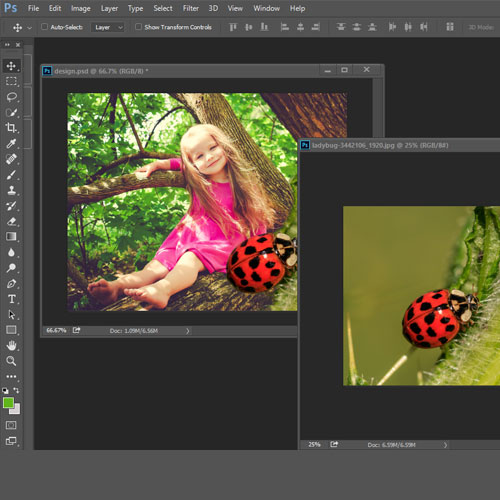
Moving on, we got two photos here.

So, we have got an image of a small girl and then we have got the ladybug image.We’re going to mix these two together. So what we want to do is we want to drop one image on top of the other and create a layer mask.
Get on the Layers Panel, click on the mask, and you’ll notice that the mask appears.
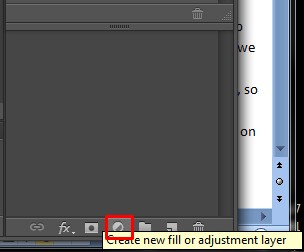
It’s doing nothing right now, and that’s because it’s filled with white. So, there’s a little thing that says that white reveals and black conceals.
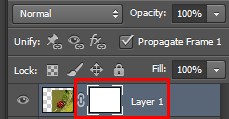
So, right now, it’s revealing the top layer(which image). Nothing is happening. But if we want to conceal this layer, we simply select a brush and we paint with black, it allows the layer underneath to show through. If we reverse that and paint with white then it’s now reveals the top layer and hides the layer underneath. So we are going to select the layer mask and we are going to fill it now with white. Hit the D key to reset the foreground and background colors. And, then, to fill that, notice we got white as a foreground color, so we will going to hit Alt Backspace, and that will fill it.
So what we’re going to do now is we want to blend these together. The way to do that is to select the Gradient Tool .
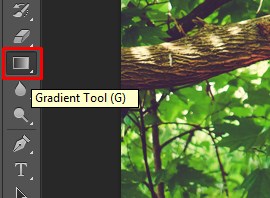
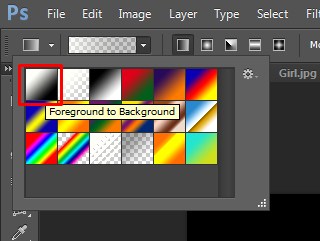
Now with the Gradient Tool, we select the white to black. To know more about how gradient tool works in depth, you can read this easy to follow article here .
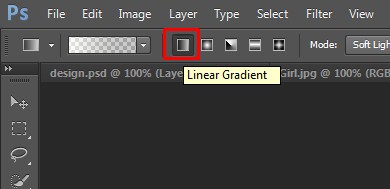
There are a couple of options up. We want to open up a Gradient Editor, and make sure that you have selected the first option, which is foreground to background, then make sure you’ve selected the Linear Option Mode,
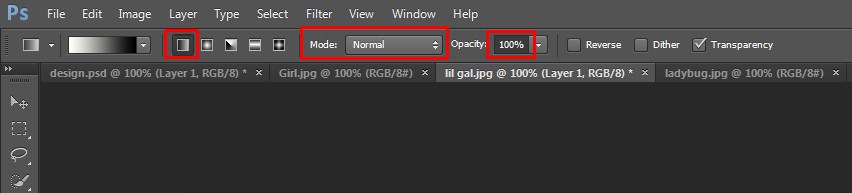
your Blend Mode is set to Normal and Opacity is at 100.
Next by selecting the mask layer, we’re going to simply select a gradient. The way the Gradient Tool works is if you click and drag, you’ll see a line, and once we release, the gradient will fill that area, and we can see that by hitting the Alt key or the Option key. You can see on the image the gradient we added, and just simply click black on the image to view it again.
So you can see what we’re able to do, we’re able to create this nice seamless blend between the foreground and the background by using the gradient.

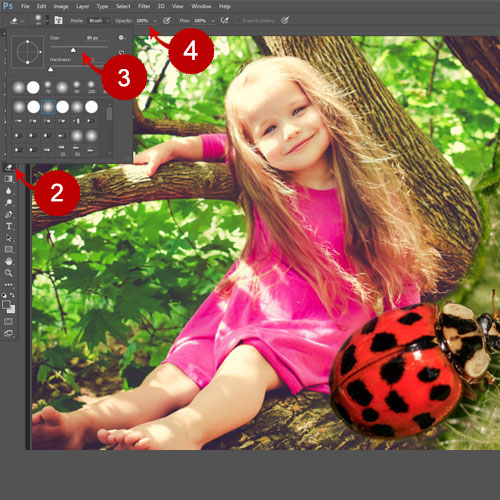
So one of the things you may want to do is just start from the option we mentioned, and then, create your own blending and then when you’re happy with that blend, you can fine tune it by simply painting inside the mask. So remember what we did earlier- white reveals and black conceals. So if we want to show more of the little girl, we simply need to paint with a white brush. So we are going to select the brush and make sure that the white is selected.
So, you can change the size of your brush many ways, but hitting the left and right bracket keys are one way and you can simply begin to paint in on the image. Gently paint and show more of the top layer. If you don’t like that, you can just undo it by pressing Ctrl +Z or Ctrl + Alt + Z.
Now, you can change the hardness of your brush. You can use a hard brush or a soft brush. A lot of the time, you can use a hard edged brush for precision selections, but in this case, as we are just painting gently, so we are going to use a soft edged brush, as this gives us the look and feel that we’re going for.
So gently paint over this with a few strokes, and you will see we were able to bring her back. Now, let’s have a look and see how that happened.
If you hold the Alt key or the Option key, you can click on the mask and see what you have done there. So as you see there’s a little bit of cleaning up that needs to be done and you can literally do that now because you are seeing inside that mask.
Now, if you find your edges get a little too hard, you can always double click, go in the mask panel and feather that mask. And then, when you feather that mask, notice what it does.
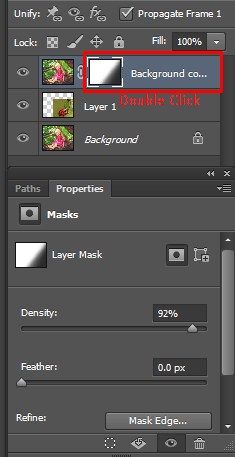
It just creates a soft edge, and let you show what happens to the mask while we’re doing it. Alt key or Option key and click and drag, and notice what we’re doing. When we feather it, we’re just simply softening that transition there, and that creates a smoother more pleasing result.
So that’s the real basics there on how to blend two images together inside of Photoshop. There’s a lot of different things that we can do with Blending Modes and masks, and different things like that you can experiment on your own. Go ahead and try it.
Related Articles:
Three Ways To Blend Two Images In Photoshop
Photoshop Tutorial: Blend Images
How to use a Layer Mask in Photoshop to blend images
This tutorial is about custom text through the clouds using Photoshop. This will help both beginner and advanced level of students in a great way. Hopefully you all will like it. Photo Courtesy – /http://www.pixelmator.com/ Firstly, open … Continue reading How to Create Custom Text Through Clouds in Photoshop
Read More
In this post we have seen how to create a drop shadow. We will carry on where we left off earlier. This time we create drop shadow in another way, go ahead and turn off … Continue reading Creating And Modifying Directional Shadows
Read More