How to Create a Double Exposure Effect in Photoshop
Here, you will learn on how to create a double exposure effects with photo edit in Photoshop. I hope it will help you both the beginner and advanced level of students in a great deal.
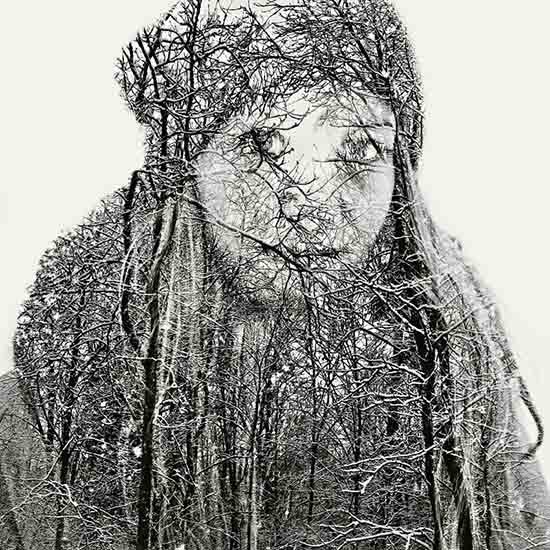
Photo Courtesy – http://www.barnabyaldrick.com/
At first, select an image that you want to work with under a layer. Make sure the image is with high contrast. At first, erase the background as we do not need that. Click on the eraser tool to do that. Break the image to a black and white image. Select it from the adjustment layer in the below. Change the preset from ‘Default’ to ‘High contrast Blue Filter.’ Increase the ‘reds and yellows’ from the preset which will brighten things up. It will help us for this image to be seen through the other image. So, select the second image. We do not need the full image of it. Now, select the layer of the first image. Click on the image and the thumbnail and go to the second image. Delete the outer layer from the second image. Go to select> inverse which will help us to select the other layers which are not necessary. Click delete from the keyboard to do that. Change the blend mode of the new image from normal to multiply. I will help us to see the face through the object. Reduce the filter as much as you want as long as it will satisfy you. Duplicate the first image from layer 1 and move it above second image. Change the blend mode of the new image from normal to multiply. That sums up the whole process.
I hope that it will help you and from now on, hopefully you will create more and more double exposure effects like this and be an expert in this field in the future.
In this tutorial, you will get to know that how you can change the color of the eyes through Photoshop. It is very important to know for the people who have been using this Photoshop. … Continue reading How to “Change the Eyes Color” in Photoshop
Read More
Hair retouching is one of the most significant items of retouching. Many of you people are may be familiar with using clone and heal brushes to remove stray hair off the face or the background. You … Continue reading Hair Retouch in Photoshop
Read More