Retouch and remove objects from an image
In this following article I am going to show you techniques used for retouching images. Photoshop is mainly famous for its retouching capabilities or we can say sometimes even infamous for its features. This is because there are examples, where retouching went wrong. And we could also argue whether it’s actually, ethically a good thing that most of the images are being retouched in publications, magazines and online.
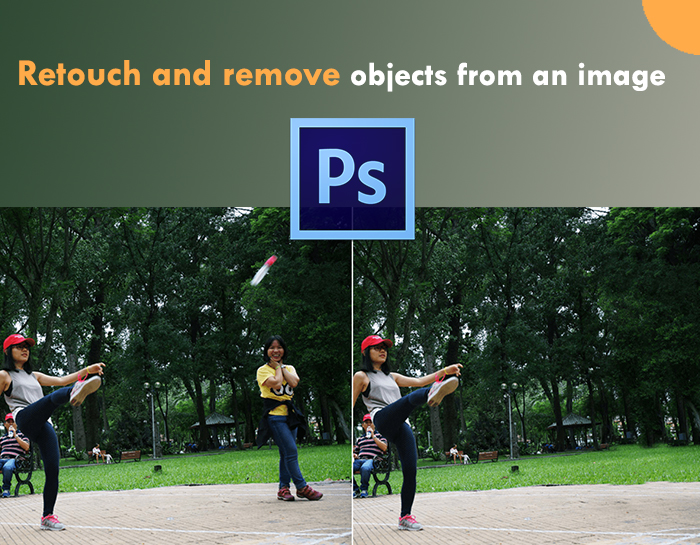
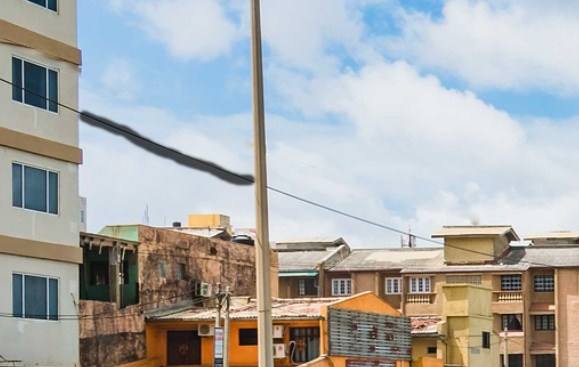
In our case, let’s start with something definitely harmless. We will be Removing a couple of things from the following image.
Original by Pixabay/ CC BY and edited by Clippingpathservice
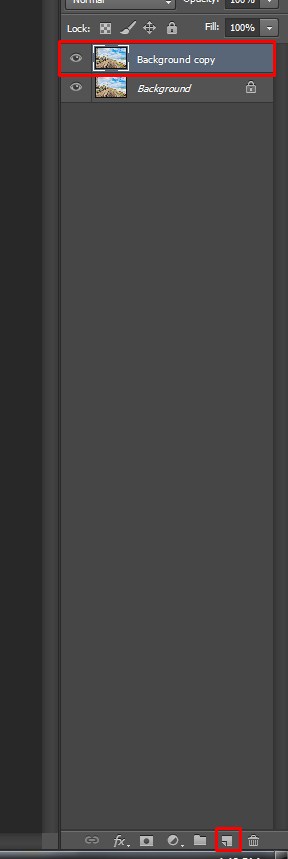
We want to remove the wire lines from the left side of the image to make the image more clean and we can also play around with a couple of other details as well. First before you do any retouching try to always do it non-destructively. And the way you can do that is by creating a separate layer. So by clicking on the New Layer Icon and then you can call the layer retouch. We will do all our retouching on this layer, so that means it won’t affect the original image; the background layer.
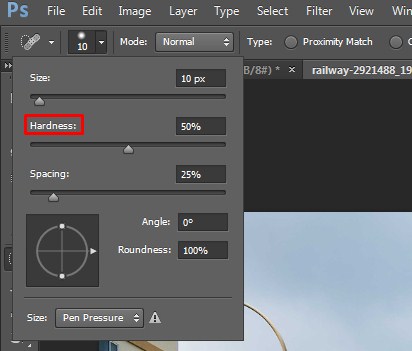
The retouching tools can be found in the same place. We will start with the first one called Spot Healing Brush Tool.
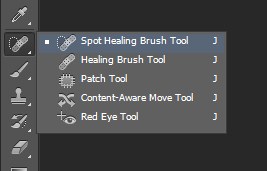
If you want to quickly get to this tool press Shortcut is J. Note this tool is a brush, which means we can change the size with the square brackets [ or ]. You don’t need it to be too big, try to keep it close to the size that will cover the details that you need to remove.
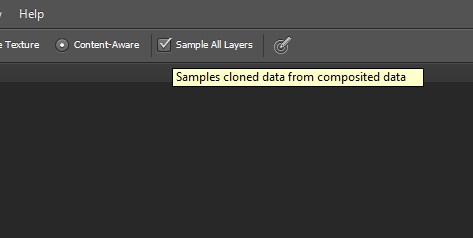
Now one important thing to do, is to make sure you select the Sample All Layers option. This is necessary if you want to do your retouching on that separate empty layer.
When you press over the line and let it go then it automatically replace the content. The way these two works is that its samples from the image mainly in the surrounding areas. It looks for similar details that can be used for the replacement. So you don’t have to do anything special just simply paint over details. And sometimes you might want to paint over a few details a couple of times.
Plus another useful thing to do is to reduce the hardness of your brush because using it on 100% might not give you as good results as with a Softer Edge Brush.
So I’m just going to continue painting over the cable and then carry on painting over the rest of the parts until all the cables are no longer in sight. So just going to the cables all over and if you use a mouse you can also just click on one side and then Shift-click on the other side, if it’s a straight line. That way you can very quickly remove the details.
Side tips: If you want to remove bigger details then I recommend to make a bigger selection. Don’t make too small details because that might not delete it properly. Sometimes it’s just duplicate details that you are actually planning to remove.
So best is to cover a bigger area first, then Photoshop knows exactly that you want to remove all those details so it won’t keep duplicating the unwanted parts. And then of course you can paint over some details a couple of times until it’s completely removed. So this is how it looks. Before by turning off the retouch layer and after.
But just to see this used on bigger details. Go over and zoom closer to the front of the image and making my brush size bigger let’s see what happens. You maybe just increase the hardness slightly and paint over the yellow building to remove it.
Let’s see what happens it did quite a good job, but replicated up detail that again just looks weird. So I’m just going to paint over that and then also paint over this detail until it’s all clean up satisfactorily. And you can see with a couple of brush strokes, we have managed to replace a very big detail again in the image. So now if you zoom out we get the final image.

Most of the time if you want to retouch and also improve the image Tonal Values, Colors or Contrast it’s always good to do the retouching first and then apply Filters or Adjustment Layers. That way your adjustments will apply to both the retouch layer and the original image.
So as you can see, once you paint over the required part it’s end up giving a pretty good result. There’s one problem, though, transition between the background and the foreground, it’s not consistent, or it’s not perfect even after a couple of brush strokes, it’s still creating strange color details on the image.
That is again because of this tool is automatically sampling from the image and the fact that there is so much sky color here. Photoshop is not sure whether to sample from the foreground or the background. That’s why you get unexpected results.
And in this cases. It’s best to swap tools and switch to the Healing Brush Tool. Which is a more advanced version of the Spot Healing Brush. With this you have to sample from the image and then you will know exactly what you are going to use for replacing details. You can read the article on Healing Brush Tool here. Hope you will use the idea to enhance your image.
Related Articles:
In this tutorial, you will learn on ‘How to do a photo manipulation on watercolor effect of images in Photoshop.’ I believe that it would be very helpful for both beginner and advanced level of … Continue reading How to do a Photo Manipulation on Watercolor effect of images in Photoshop
Read More
In this post, you will learn on how to copy layer mask from one layer to another or even from one to another open document. Hopefully, this will help the beginner level of students in … Continue reading How to Copy Layer Mask to Another Layer in Photoshop
Read More