How to Make the ‘Matrix Text Effect’ in Photoshop
In this section, you will learn on how to make the matrix text effect in Photoshop. I hope that is helpful for all and the beginner level of Photoshop students especially.
At first, we need to open a new document. This time, we need to preset it by 640*480 and click OK. One of the prerequisite works that is needed to be done is that we need to set the background color to black and we will do that by making sure that our foreground color is also black. If it is not, then we need to do it by manually. Next, we need to select a color to use. We select a swatches palate and select a color of our own choice. Now, we need to create a backdrop of random code. Easiest way to do this is to go to the text editor such as notepad or Microsoft Office word and open up an image file where the software does not support. hat will create a random mess of letters or numbers or symbols that is perfect for this tutorial. So, open a windows notepad and select format and make sure that ‘word wrap’ is ticked there. Next, go to the file menu bar and open an image. As notepad cannot read particular file format, it gives me the actual effect that I want. Highlighted them all and it is actually better to have too many but not enough. Once that is done, copy them all and select a text type in Photoshop and change the text size to 6 points. Use the font named ‘Lithos Pro.’
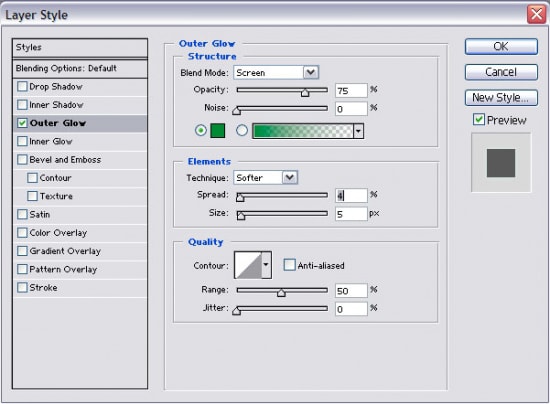
Photo Courtesy – http://www.webdesign.org/
Next, go back to the right side of an image and change the horizontal text to vertical one. Then paste all the characters of the image by clicking Ctrl + V. If a little scroll can be done, we will see that the over-text is copied in Photoshop. Now, select the move tool and zoom out. This time, we need to change the name of the layer and drag it to the new layer icon to duplicate the layer twice and change the name of these two as well to suppose 9 and 12 pts. Now, turn off the 6 and 12 layers. Select the 9 pts layer and scroll it out until all the texts are visible. Select the text tool and double ‘F’ click the layer icon over there to over text the layer and change the font size to 9 pts. As we did before, select the move tool and move the text block to the position that you are happy. Now turn off the layer to make that layer invisible and turn on the layer called 12 pts. We will do the same thing in this layer but with little different way. We will select Ctrl + A to over text on the layer. All are the same though. This time we will need to change the font size to 12 points, select the move tool and move it to the position as we did before. Turn on all the layers eye ball this stage. This time select 6 pts layer and go down to the layer mask icon of the bottom of the layers pallet and click it to add a layer mask to a layer. We need to make sure that the layer mask is selected and hit ‘D’ on the keyboard to make sure that we are using the default background and foreground colors. Then go to the filter, render and cloud gradually. Now, we need to do the exact same thing to the other two layers. As 12 pts is our active layer, let’s change the blending mode to color dodge as well as the 9 pts layer. Now, go back to the 12 pts layer and make some adjustments in this layer. Next, we need to select the 6 pts type layer and with the type but not the mask selected and we are going to layer and rasterize and then type. Now, we get a slide blur after rasterized it. To apply it, you will find the blur in the filter bar. This time, we need to create the main text for our image now. In order to do that, we need to deactivate all the layers except the black layer. Hit Ctrl + Shift + N to create a new layer by naming it the main text and click OK. If you hit the ‘T’ key to switch to the text tool and click the foreground color, we can change the text color to white. We need to make sure that the hue is selected. We also need to adjust as we need to type horizontally this time and select the matrix font. If you do not have that just download it from Google and save it through the control panel of your computer. Increase the text size to 30 font to visible it better way. Use the move tool to adjust the writing that suited best for the image. Next, double click to the outside of the layer and it brings the layer stall pallet. Select the outer glow change the color of the glow to match the color of our own image and adjust the others as well. That will do that.
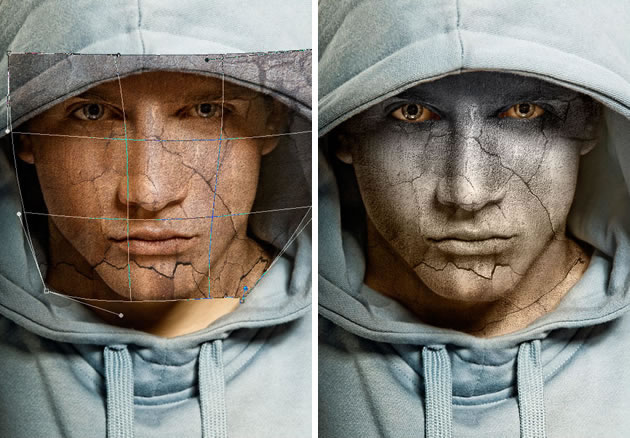
Here, you will learn how to photo edit and turn a portrait into a sculpture in Photoshop. This will help the both beginner and advanced level of students in a great details. At first, open … Continue reading How to Turn a Portrait into a Sculpture in Photoshop
Read More‘Vicious and Pretty’ retouching is also another important kinds of retouching. It looks both pretty and vicious at the same time. Therefore, it is tough as well as it is challenging. Photo Courtesy (both) – https://jollyrebels.wordpress.com/ … Continue reading ‘Vicious and Pretty’ Retouching
Read More