Montage or Neck Adding in Photoshop
In this tutorial, I will try to show you how to do ‘montage’ in Photoshop. I hope this is going to be a helpful tutorial to have for the Photoshop learners both for the beginners and the advanced learners.
We are going to do a montage of an image that is of a t-shirt. At first, we need to make a path of the desired image both the front and back part that of our choice. After doing the path, we need to make the path selection by clicking Ctrl prior to that. Then we need to go to the layer option and make a new layer. We can click Ctrl + J to do that as that is a shortcut of creating a new layer. We have to do this twice because one of them would be a copy of layer 1. Then, we need to mark the layer 1 and press Ctrl + Del. We need to move back to the back portion of the t-shirt and select the path of that by clicking Ctrl + Path and copy this by clicking Ctrl + C. Click Ctrl + Tab which will bring the front part of the image. Click Ctrl + V to paste it on the layer 1. Now, mark on the layer 2 and press Ctrl + T which will help you to hold and move the back portion of the image and fit it right in the front image.
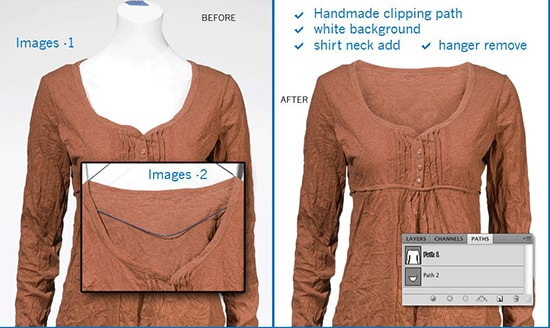
We need to move to the path section now and make a copy of path 1 or you can create a new path and name it a s path 2. Do the path properly. Click Ctrl + path 1 copy after joining them. Now, inverse it by clicking Ctrl + Shift + I. Delete it. Delete the extra portion where the extra remains on the layer 1 copy. If the t-shirt has some sort of logo, select the move tool from the tool bar or just click ‘m’ and select it. Mark on the layer where the back portion remains of the image. It is on the layer 2 for mine. Then we need to click Ctrl + J to make a new layer by the name of layer 3. Go to layer 3 and click Ctrl + T. Move the logo upwards now. Click ‘E’ which is the eraser tool and erase the unnecessary part of the image. Create a new layer by clicking Ctrl + J. Select brush tool from the toolbar and give a shadow using a small brush tool. It is important to keep the layer in multiply and you can reduce the opacity of the shadow as of your choice which looks good to you and which fits the image.
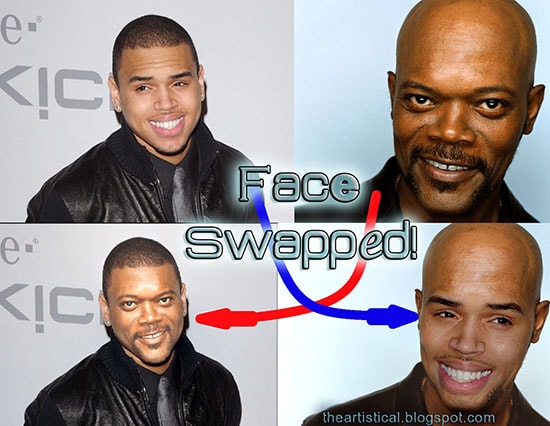
Here, you will learn on how to swap faces with photo edit in Photoshop. I hope it will help you the beginner level of students in a great deal. To do that, you need two images … Continue reading How to Swap Faces in Photoshop
Read More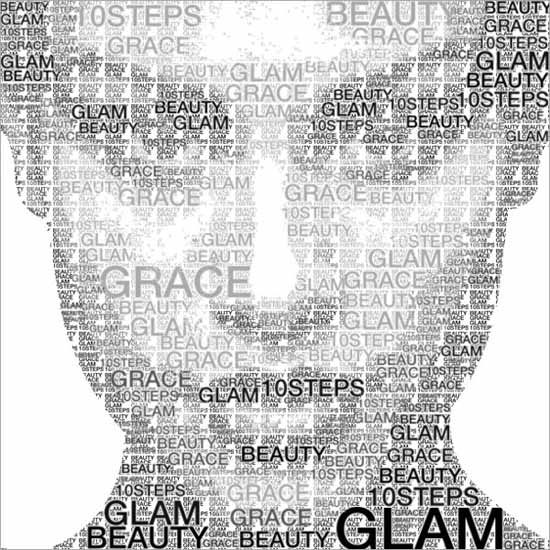
In this tutorial, we will learn how to create a text portrait effect in Photoshop. Like we added a transparent text to an image, we’ll now give the illusion that the picture shown is being created by a … Continue reading How to Create a Text Portrait Effect in Photoshop
Read More