How to Create Masks in Photoshop CS5
In this tutorial, you will learn how to create masks through Photoshop CS5. I hope it will help the everyone and beginner level students of Photoshop specially.

Photo Courtesy – http://www.popscreen.com/
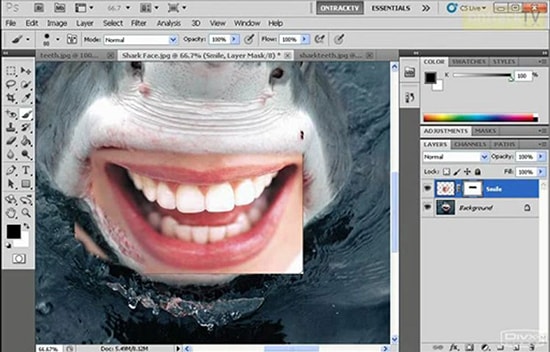
In order to do this, you need to select two separate pictures of your own choice. Almost look like the same picture will do the job best here. Suppose that, those two images are- smile from a lady and other one is a hungry whale open it’s mouth. Then, you need to select the rectangular tool to select the whole image that of picture no. 1. Copy the image and paste it to the other image of your choice. The first image was also need to be fall under layer mask and you may give the name of it as a background layer mask. After doing that, you will get a new layer and you need to rename the layer by your own choice for your own benefit. You have to make sure that you are working on while the layer is selected. Now, come to the bottom of the layer portion and select mask button. It will make a thumbnail which is the actual mask and the one that is left on that mask is the image. So, you need to be careful on which thumbnail you are working on. If you need to paint on the image, you have to select the image thumbnail which is on the left. It will affect the image only but not the mask. On the contrary, if you select the mask thumbnail which is on the right, the result will be contrary as well. When you are working on the mask, you can switch between black and white color. As the mask is looking white, it means that all the contents on this particular layer is going to be visible. If you choose the black color, then it will hide some of it’s details. So, you can use this color to hide the skin of a smiling lady and it will certainly suit the desired result that we want. So, that is how you can create masks in an image through Photoshop.

