How to Give an Image a Comic Style Effect in Photoshop
Here, you will learn on how to give an image a comic style effect using Photoshop. Hopefully, this will help many students.
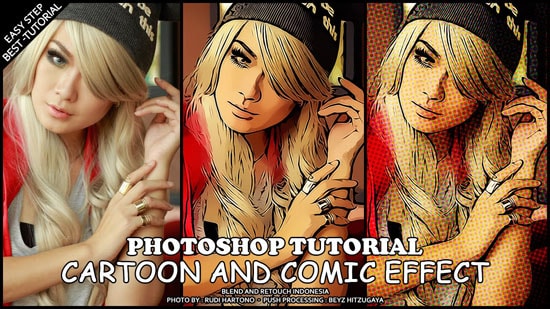
Open the image that you want to give a comic style effect. Adjust the levels of the photo by going to Image> Adjustments> Levels. Use the Grain filter to give the image a textured feel like an old comic book. Go to Filters> Artistic> Film Grain and use the settings on Grain, Highlight area and intensity that you think will work best. Duplicate the photo layer and on the new layer you will be applying a halftone pattern to give the old dot printer effect. With the new layer selected, go to Filter> Pixelate> Color Halftone to do that. Set the Max radius to 4 and the rest as default. If the image looks too bright, sort it by setting the blending mode to darken. Add a paper border around the outside of the dot layer. Right click on the layer and select blending options. Then click on stroke on the next window. Set the size to 20px and position it on the inside. Set the color to #f5ece3. To add some captions, get some text areas on the image. Add a rectangle in the top left and bottom right and make them different colors by using the blending options to give them a black 2px stroke around the outside.
Photo Courtesy – Give an Image a Comic Style Effect
The final step is to give the image a hand drawn style border. To achieve this, you need to create a new layer above the others. Then with this layer selected, use the ‘Rectangle Marquee Tool’ and select around the outside of the image but inside the white border. After that, go to Edit > Stroke and set the width to 4px, color to Black, location to center and click ok.
Now, de-select the selection by holding and pressing Ctrl+ D. Then, go to Filter> Blur> Blur More. Next, go to Filter> Distort> Ripple and set the amount to 20% and the size to medium.
Then, sharpen the stroke by going to Filter > Sharpen More.
That sums the whole process. In this way, you can photo edit and create this comical effect. Hope that helps!
Here, you will learn on how to give an image a comic style effect using Photoshop. Hopefully, this will help many students. Open the image that you want to give a comic style effect. Adjust … Continue reading How to Give an Image a Comic Style Effect in Photoshop
Read More
Here you will learn on how to achieve a cinematic effect on your image in Photoshop. It can be done using color curve layers with some shortcuts using color adjustment layers and color lookup adjustment … Continue reading How to Create a Cinematic Effect Using Photoshop
Read More