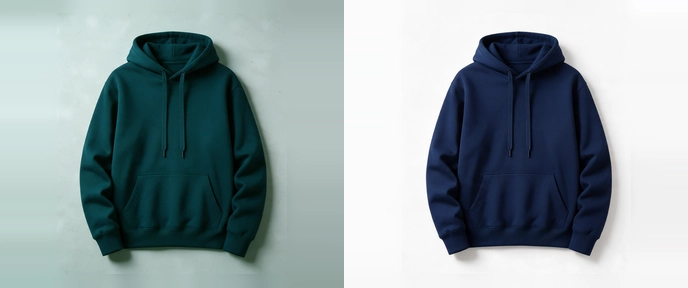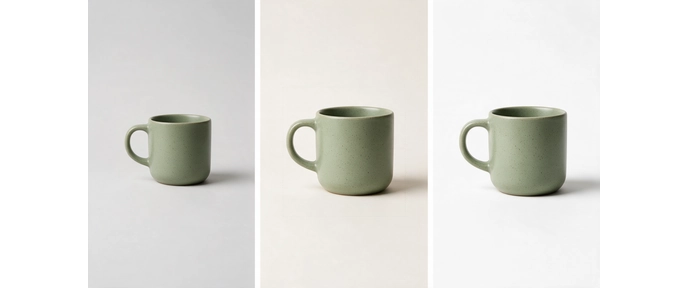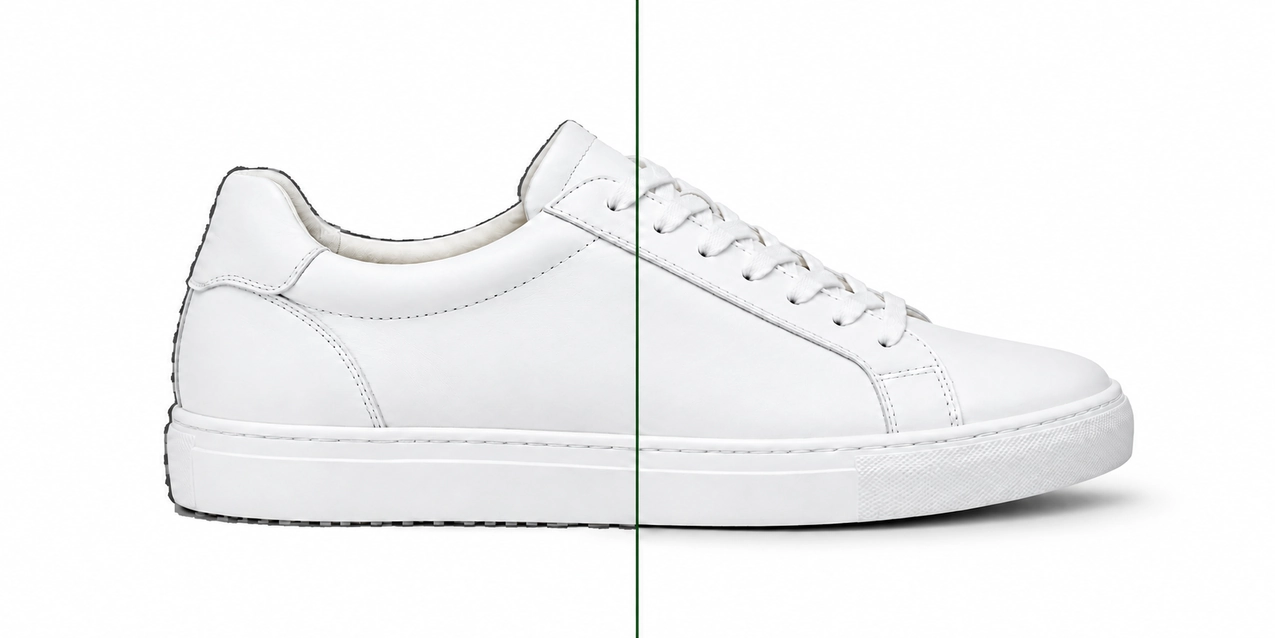
Photoshop can remove a background in about three seconds.
The trouble starts in the minutes after that. A faint grey outline around a white sneaker. A necklace chain that vanished halfway down. Hair that looks like it was trimmed with safety scissors. You zoom in, fix one edge, spot another, and 40 minutes later you are still on the same photo.
This guide covers both halves of the job:
- How to remove a background in Photoshop, using the right method for the image in front of you.
- How to know when you are done, so you stop refining at the point where the image is ready, not the point where you run out of patience.
It is based on what our editors have seen across more than 21 years of hand-cutting product, portrait, and catalog images for photographers, eCommerce brands, studios, and agencies. The core lesson from all those years fits in one sentence:
Background removal isn't finished when Photoshop removes the background. It's finished when the cutout meets the standard the image is going to be judged by.
First, Decide What "Done" Means for This Image
Before you touch a tool, answer one question: where will this image be used?
- A quick social post or internal mockup: a clean look at normal size is enough.
- A marketplace listing or product page: customers will zoom. Edges must hold up at 100%.
- A large banner, print ad, or client deliverable: every edge, shadow, and highlight is on display.
The same cutout can be finished for one use and unfinished for another. Knowing the target up front is what makes a stopping point possible later.
Method 1: The Fastest Way (Remove Background Quick Action)
Use this when the subject is clearly separated from a plain, contrasting background.
- Open your image in Photoshop.
- In the Layers panel, click the lock icon on the Background layer to turn it into a regular layer.
- Open Window > Properties.
- Under Quick Actions, click Remove Background. (In recent versions you can also click Remove background in the Contextual Task Bar under the image.)
- Photoshop detects the subject and adds a layer mask that hides the background.
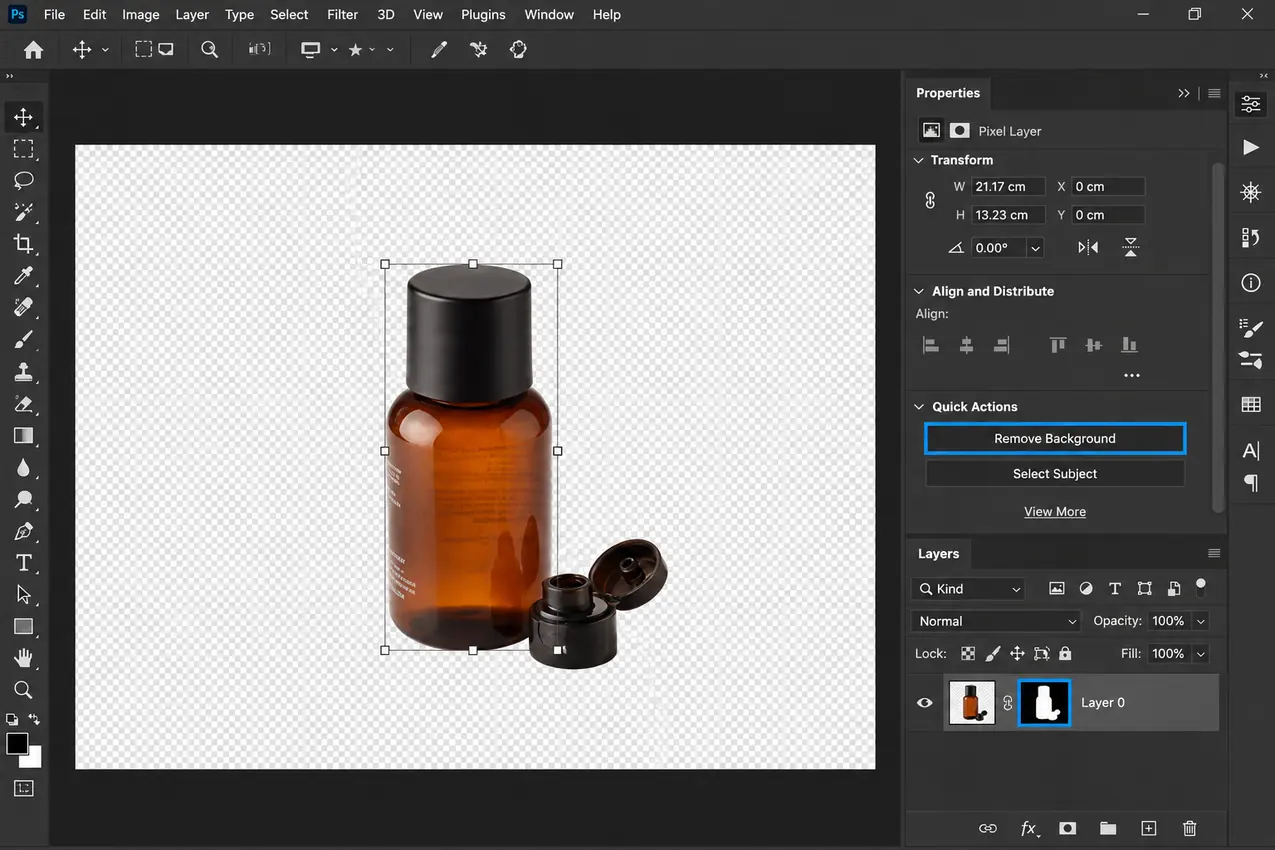
Because the result is a mask, nothing has been deleted. Paint on the mask with black to hide more, and with white to bring areas back. That makes every later fix reversible, which matters more than it sounds once you start refining.
Where this works well: a bottle, a mug, a boxed product, or a person against a clean studio backdrop. On images like these, the quick action often gets you 90% of the way in seconds.
Where it struggles: low contrast between subject and background, busy backgrounds, fine detail such as hair or chains, and anything transparent or reflective.
Method 2: Select Subject + Select and Mask (For Imperfect First Passes)
Use this when the automatic result is close, but the edges need real work.
- Go to Select > Subject. Photoshop draws a selection around the main subject.
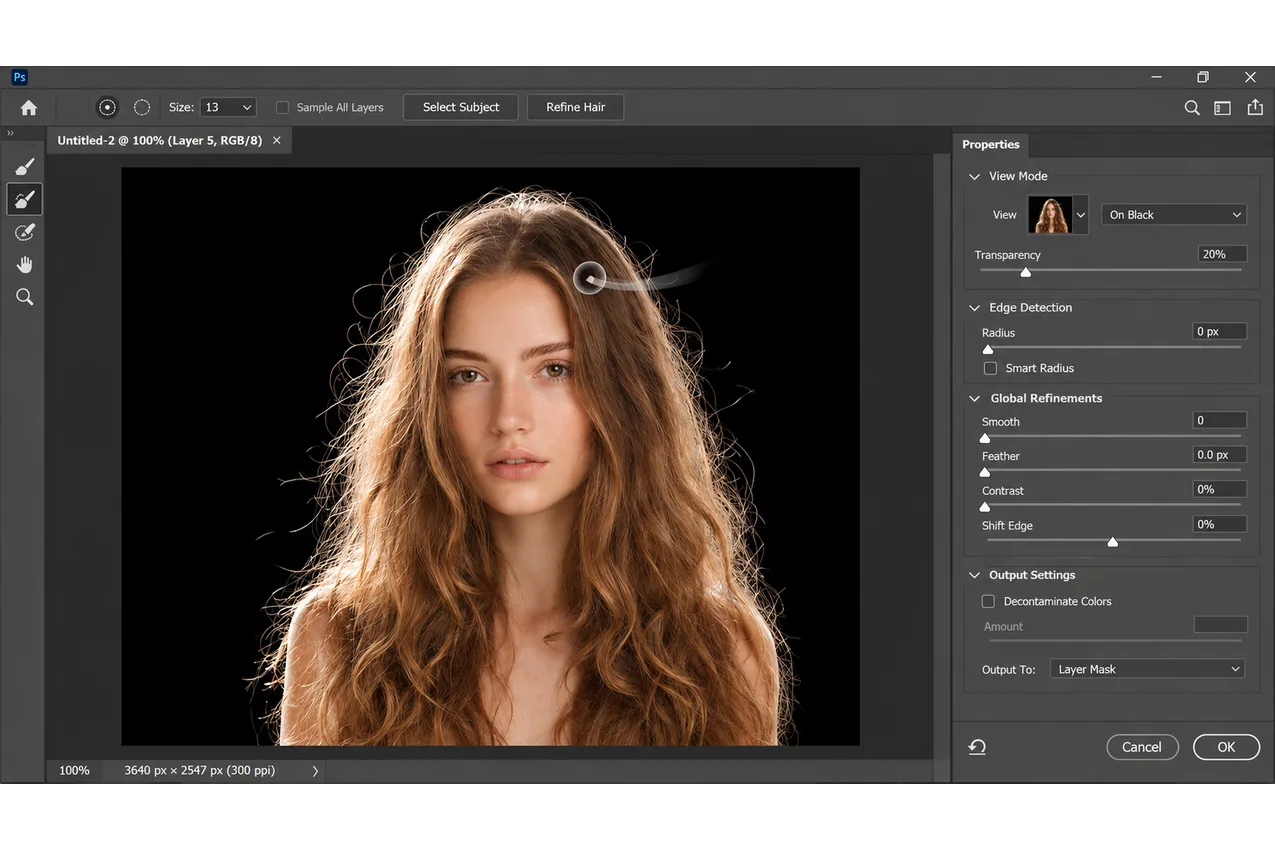
- Go to Select > Select and Mask to open the refinement workspace.
- Set View to On Black or On White (pick whichever contrasts most with your subject) so bad edges become obvious.
- Use the Quick Selection Brush to add missed areas or subtract extra background.
- Use the Refine Edge Brush only on soft or complex edges like hair, fur, or fuzzy fabric. Brush along the edge, not across the whole subject.
- Adjust Smooth, Feather, and Shift Edge lightly. Small values go a long way. A Shift Edge of a few percent inward often removes a thin background outline.
- Tick Decontaminate Colors if background color is bleeding into the edges (a green tint on blonde hair shot against grass, for example).
- Set Output To: Layer Mask (or New Layer with Layer Mask if you ticked Decontaminate Colors) and click OK.
Common mistake: Turning Smooth or Feather up until the edge looks "clean." In reality, Photoshop is often blurring the edge instead of fixing it, which makes products look soft or pasted onto the new background.
Method 3: The Pen Tool (For Hard-Edged Products)
Use this for products with defined, solid edges: electronics, furniture, shoes, bags, bottles, packaging.
- Select the Pen Tool (P) and set the mode to Path in the options bar.
- Click to place anchor points around the product. Click and drag to create curves.
- Place the path slightly inside the product edge (about half a pixel to one pixel). This keeps background pixels out of the cutout.
- Close the path, then right-click and choose Make Selection. Use a Feather Radius of 0 to 0.5 px.
- Add a layer mask from the selection.
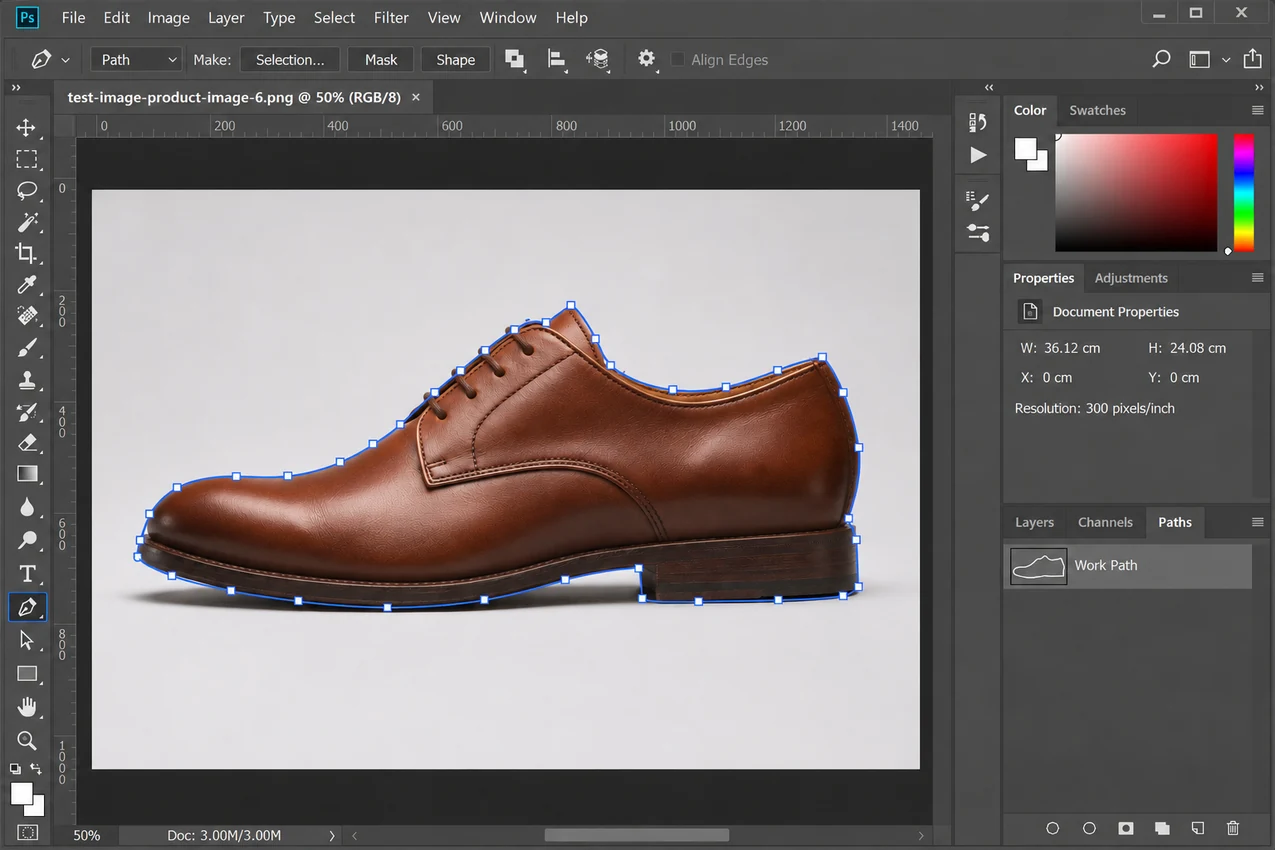
This is a clipping path, and it is the method our editors have relied on for crisp product edges since the company started. It is slower than one click, but it produces an edge that is sharp, smooth, and consistent from one image to the next, which automated selections can't guarantee. The Pen Tool doesn't guess where the edge is. You decide exactly where every curve begins and ends, which is why it remains the standard for crisp commercial product cutouts.
For products with several parts that need separate color or retouching adjustments (a watch face, strap, and buckle, for example), editors draw a separate path for each part. That is known as a multi clipping path.
Which Method Should You Use?
| Image type | Best starting method | You can stop when... |
|---|---|---|
| Simple product, plain background | Remove Background quick action | The edge looks clean at 100% zoom |
| Defined object, some low-contrast edges | Select Subject + layer mask | No halos or background outline visible |
| Hard-edged product for eCommerce | Pen Tool clipping path | Corners and curves follow the true product shape |
| Hair or fur | Select and Mask + Refine Edge Brush | Individual strands look natural, not chopped |
| Jewelry, chains, fine detail | Manual path plus masking | Chains, gaps, and highlights are all preserved |
| Glass, liquids, sheer fabric | Advanced layered masking | Transparency still looks believable on a new background |
There's a clear tradeoff: as edges become more complex, automation becomes less reliable. The more complex the edge, the more manual the method, and the higher the bar for "done."
Remove Background vs Clipping Path vs Photoshop Masking
Photoshop gives you several ways to remove a background, and it's tempting to treat them as interchangeable. They aren't. Each one was built to solve a different kind of edge problem. Picking the right technique for the edge in front of you saves more time than any setting inside the tool.
| Technique | Best for |
|---|---|
| Remove Background | Quick cutouts where the subject is clearly separated from a simple background. |
| Clipping Path | Hard-edged products like shoes, bottles, furniture, packaging, electronics, and eCommerce product photography that need crisp, consistent edges. |
| Photoshop Masking | Hair, fur, lace, glass, sheer fabric, smoke, reflections, transparent materials, and other soft or semi-transparent edges. |
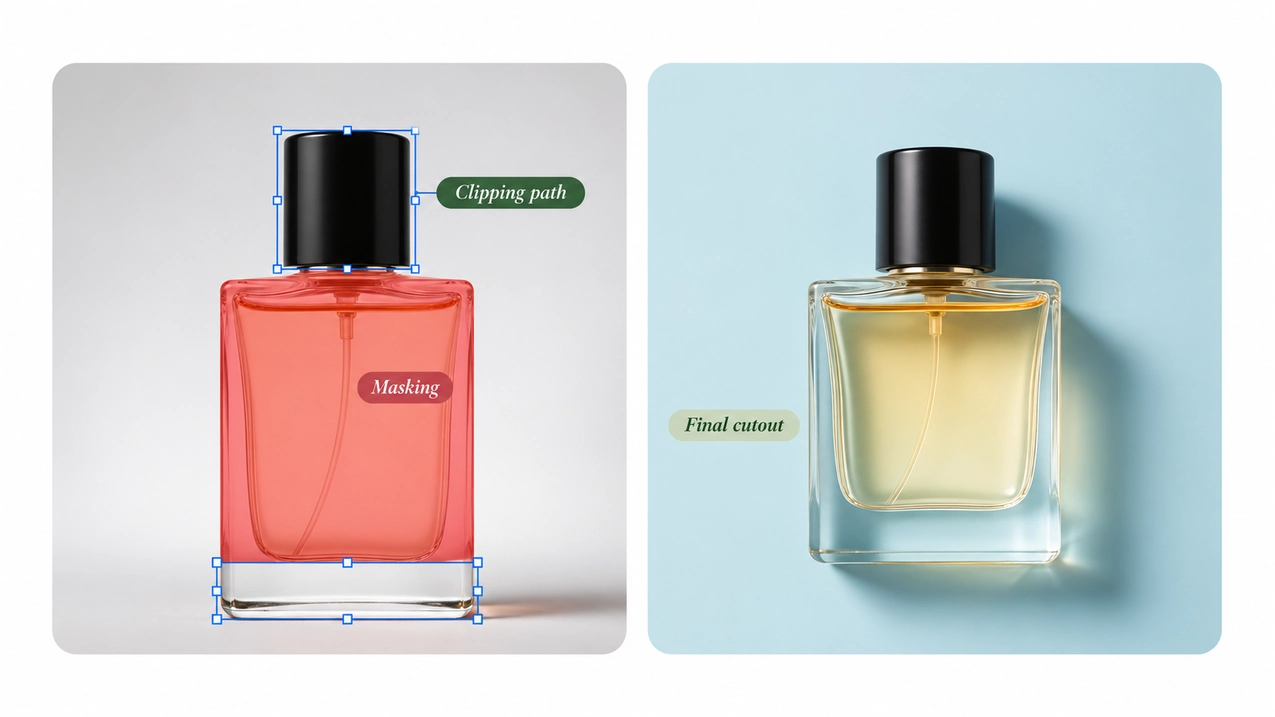
In practice, professional editors rarely rely on a single tool. A product like a perfume bottle might get a clipping path for its solid cap and base, and Photoshop masking for the glass and liquid, all on the same image. Combining the two is what keeps hard edges crisp and soft edges natural at the same time.
The Edges You Should Always Check
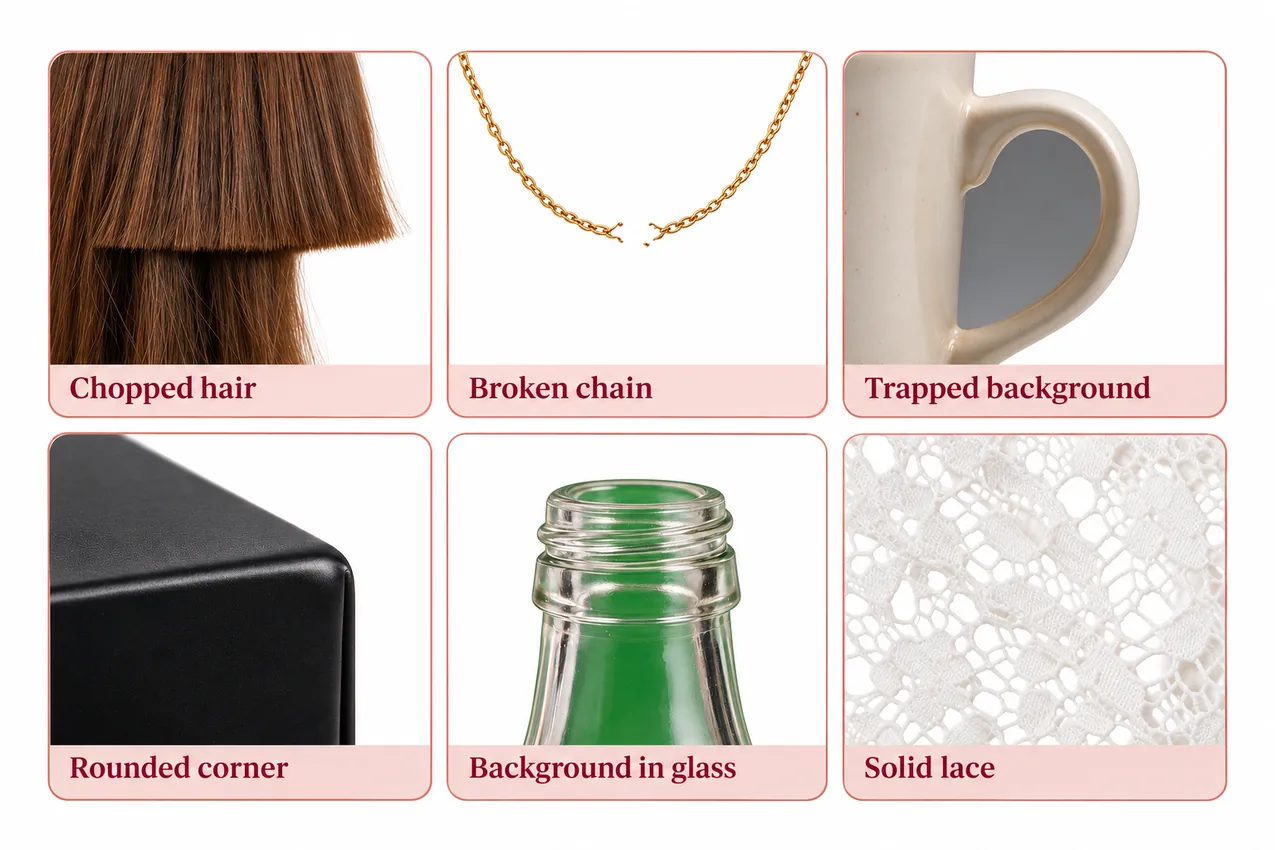
Most bad cutouts fail in the same handful of places. Inspect these first:
- Hair and fur: Look for flat, helmet-like edges or strands that end abruptly.
- Fine chains and straps: Check that thin sections were not dropped or broken.
- Small gaps: The space inside a handle, between fingers, or through a chain link should show the new background, not the old one.
- Product corners: Sharp corners get rounded off by automatic selections.
- Transparent and reflective areas: Glass, bottle necks, sunglasses, and polished metal often carry the old background inside them.
- Semi-transparent fabric: Lace, tulle, and mesh either turn solid or disappear.
- Shadows: Decide whether the shadow should stay. If a natural shadow was removed by accident, the product will look like it is floating.
How to Tell If Your Background Removal Is Actually Clean
A cutout that looks fine against a transparent checkerboard can fall apart on a real page. Run this five-minute check before you export.
1. Put a contrasting color behind it. Add a Solid Color fill layer below your subject. Test on black, on white, and on a bright color like magenta. Each one exposes a different problem. Light halos show up on black. Dark fringes show up on white. Leftover color casts show up on bright colors.
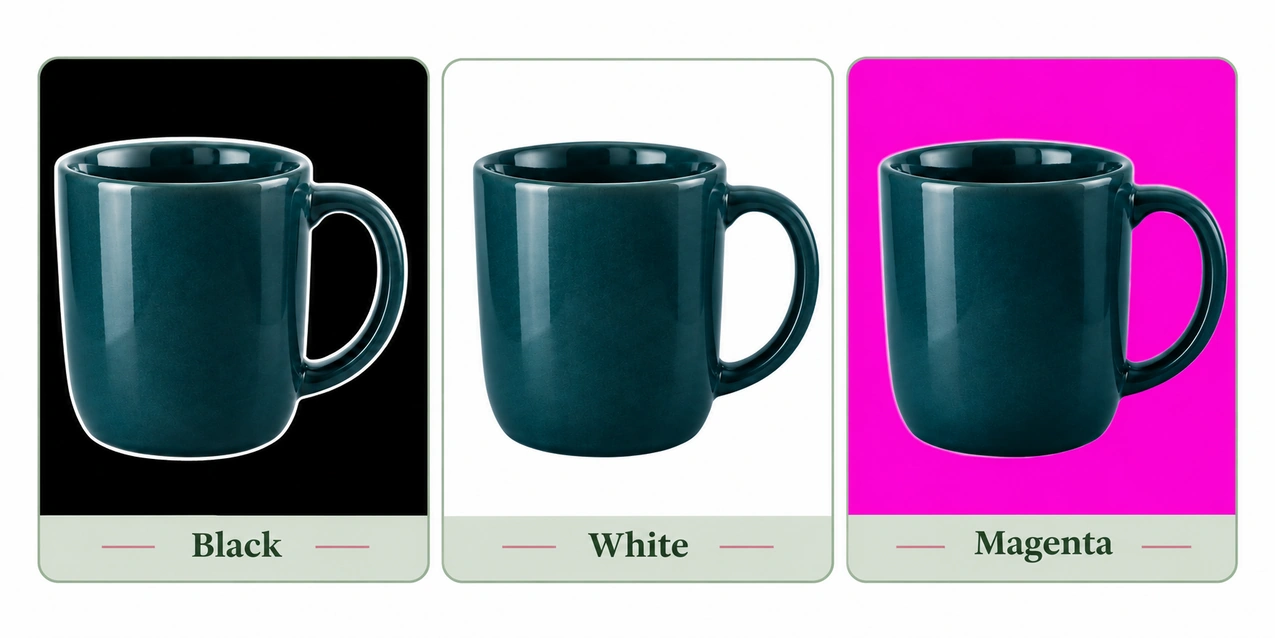
2. Zoom to 100%. Customers zoom on product pages. Check every edge at actual pixel size, not "fit to screen."
3. Ask these six questions:
- Is there a light or dark halo around the subject?
- Did any detail of the product disappear?
- Are edges unnaturally sharp or jagged where the real object is soft?
- Did the selection cut into the product itself?
- Is any of the old background color still visible?
- Does the subject look natural on a completely different background?
4. Compare with the original. Toggle the mask off and on (Shift-click the mask thumbnail). Anything that was in the original product and is missing now is a problem.
5. Export in the right format. For a transparent background, use File > Export > Export As and choose PNG with Transparency checked. For a white-background product image, keep the white fill layer and export as JPEG. Never save a transparent cutout as JPEG. The transparency will be lost.
When to Stop Editing
Most Photoshop tutorials stop after the cutout. The expensive part usually starts afterward, and it is where most wasted editing time lives.
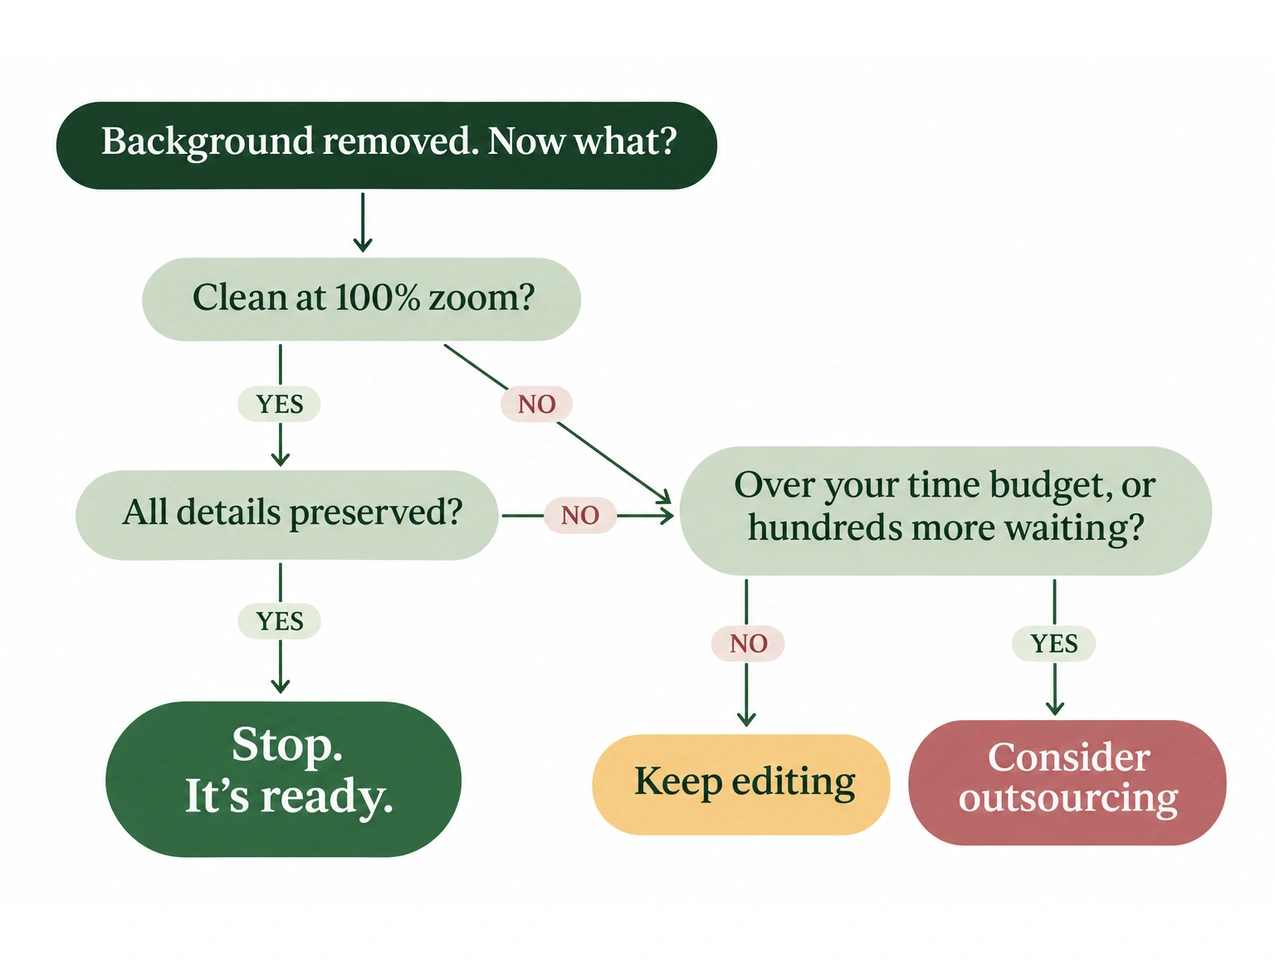
Stop when:
- The edge is clean at the size the image will actually be viewed.
- No halo or fringe is visible on a contrasting background.
- Every important product detail is preserved.
- The image meets its intended use (see the first section).
- Your last few edits made changes nobody will notice without comparing before and after at 300% zoom.
That last point is the real test. If you can't tell whether an edit improved the image, it did not improve the image enough to matter.
Keep editing when:
- A detail of the product has been removed.
- A halo or color fringe is visible.
- Hair or fur looks cut out rather than natural.
- Glass or transparent material looks solid or fake.
- A natural shadow was destroyed unintentionally.
- The image will be printed, shown large, or used in high-value commercial work.
Set a time budget before you start
Decide how long this image deserves before you open it. A simple product might be worth five minutes. A hero banner might be worth an hour. If you reach the budget and the image still fails the checklist above, that is not a signal to try harder. It is a signal to change the approach, whether that means switching methods, reshooting, or handing the image off.
Consider outsourcing when:
- A single image is taking far longer than your budget.
- You have hundreds of similar images waiting behind it.
- Every image in the batch must match the others.
- The images are full of difficult edges: jewelry, hair, glass, lace.
- The deadline matters more than learning another Photoshop technique.
Working through a large batch?
If you're editing hundreds of product photos, a free sample lets you compare your workflow with ours before committing to anything.
Send us 2 to 3 images and see the quality before placing an order.
What 21+ Years of Background Removal Has Taught Us
Clipping Path Service has been hand-cutting images for more than two decades. Over that time, the clients who reach out to us have followed a remarkably consistent pattern. Almost none of them came to us because they could not use Photoshop. Most of them could.
They came because of one of four moments.
1. The photographer after a big shoot
The shoot went well. Now there are 400 selects, a client waiting, and a background to remove from every one. Doing a single image is easy. Doing 400 while also booking the next shoot is where the calendar breaks.
What we do: Hand-drawn clipping paths for hard-edged subjects, Photoshop masking for hair and soft edges, and the same quality check applied to every file, so the photographer can deliver the set without spending a week behind the screen.
2. The eCommerce brand launching or refreshing a catalog
The challenge here is rarely one hard image. It is 1,000 easy-looking images that all need to look like they belong to the same store. A small difference in edge softness, shadow, or product position is invisible on one listing and very visible on a category page. (We covered this problem in detail in How to Fix Inconsistent Product Photos After a Professional Photoshoot.)
What we do: A standardized workflow set up for the whole batch before editing begins, so image 1 and image 1,000 are cut, aligned, and checked the same way. Our production team handles anything from a small test batch to runs of 10,000+ images.
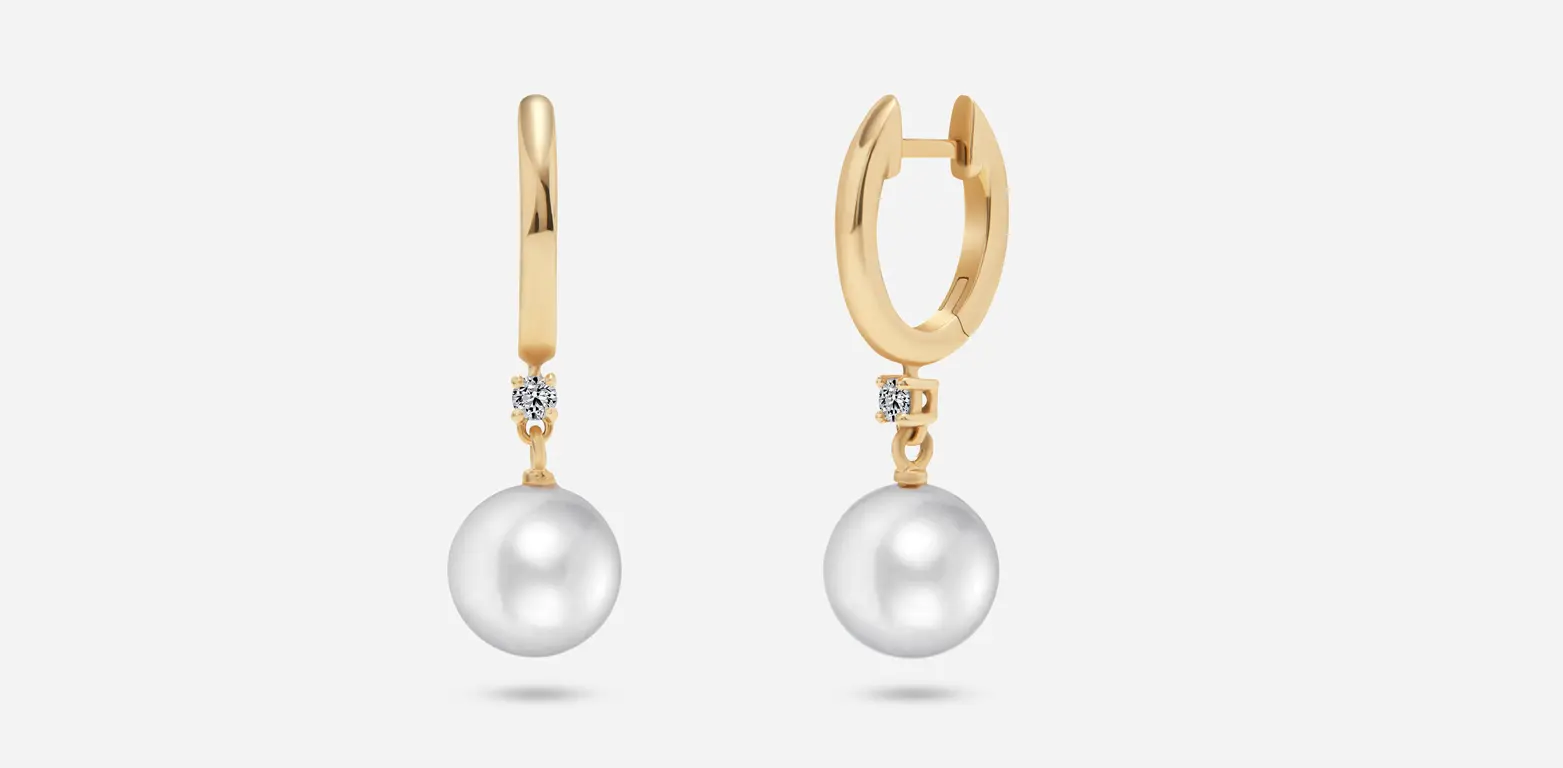
3. The jewelry and fine-detail seller
Jewelry is where automated background removal most often fails. Fine chains disappear. Reflective metal carries the old background inside it. Soft contact shadows get stripped away and the piece looks like a sticker.
One recent project put all of this to the test: 1,200 jewelry images, hand-cut and delivered in 4 days, with every chain link, gap, and highlight preserved. You can read the full breakdown in our Bulk Clipping Path Case Study: 1,200 Hand-Cut Jewelry Images in 4 Days.
4. The agency with a deadline that moved
A campaign launch gets pulled forward. The creative is ready, but the product cutouts are not. For agencies, the issue is not skill. It is capacity at the exact moment it is needed.
What we do: Multiple turnaround options, including rush delivery, so the editing timeline fits the campaign rather than the other way around.
What These Jobs Have in Common
Every one of these clients already knew how to remove a background. What they needed was a way to get a production-ready result on every image, on time, without their own team stuck refining edges. That is the gap human editing still fills, and it is why we have kept every path hand-drawn and every file human-checked for over 21 years.
DIY or Professional? A Quick Decision Guide
Doing it yourself makes sense when:
- You have one image or a small handful.
- The background is simple and the subject edges are clear.
- The commercial risk of a small flaw is low.
- You already know Photoshop and have the time.
Professional editing makes more sense when:
- You have hundreds of images.
- The edges are complex: jewelry, hair, fur, glass, lace.
- Every image has to match the rest of the batch.
- The deadline is tight.
- The images are going in front of paying customers or a client.
There is no wrong answer. The goal is simply to spend your editing time where it produces a visible return.
Frequently Asked Questions
What is the fastest way to remove a background in Photoshop?
The Remove Background quick action in the Properties panel (or the Contextual Task Bar in recent versions). It creates a layer mask in seconds. It works best on subjects with clear edges against a plain, contrasting background.
Why does my cutout have a white or grey outline?
That outline is a halo: leftover background pixels along the edge. Fix it in Select and Mask by shifting the edge inward slightly, or by ticking Decontaminate Colors. Check the result on a black background to confirm it is gone.
How do I make a background transparent in Photoshop?
Remove the background using a layer mask, make sure no filled layer sits underneath, then export with File > Export > Export As, choosing PNG with Transparency enabled.
Is the Pen Tool better than Select Subject?
For hard-edged products, yes. The Pen Tool gives a crisper, more consistent edge. For hair, fur, and other soft edges, Select and Mask with the Refine Edge Brush is the better choice. Many professional cutouts use both on the same image.
How long should background removal take per image?
It depends on complexity. A simple product can take under a minute with a quick action. A detailed jewelry piece or a portrait with loose hair can take much longer when done properly. Setting a time budget per image type keeps a single difficult file from eating your whole day.
When should I outsource background removal?
When volume, edge complexity, batch consistency, or a deadline makes in-house editing slower or more expensive than the value it adds.
Get a Production-Ready Result Without the Guesswork
If you have read this far, you probably have a folder of images waiting. You now know how to remove the backgrounds yourself, and how to tell when each one is truly done.
If that folder holds 50, 500, or 5,000 images with tricky edges and a deadline attached, let our editors take it from here. Every path hand-drawn. Every file checked by a person. Consistent from the first image to the last.
No commitment. See the quality on your own images before you place an order.