AN OVEREXPOSED PHOTO: Improve in three steps
Overexposed is explained by Vangie Beal “as in traditional photography, overexposure is a term used to describe the process of exposing film to too much light, which results in the photograph being too bright. In digital photography, where there is no film, overexposure refers to a white-looking or washed-out image (overexposed image). This generally happens when a digital photo or video was shot with too much light on the subject. If you’re shooting with the wrong camera settings, the result can also be overexposed images.”
While taking photos if some of the images came out as overexpose in the stock, it is a good idea to try to fix it rather than throw it away altogether. It is quite possible to fix some of the image. As long as the highlights are not completely blown out to white, which indicates that it shows no information on the image. By using different mode of tools we can fix pictures in Photoshop.
Open the overexposed image that you want to edit in Photoshop. Now, many people fix it using curves or levels however; using the Shadows/Highlights command in the basic mode is worth the try before moving to any other ways on Photoshop.
Normally when we move the slider to the right in Photoshop we tend to increase the amount in size or number. This is not the case with Shadows/ Highlights. When you use the Shadows/ Highlights adjustment to decrease the highlights it flows on the opposing of the natural flow in Photoshop. By working on the Shadows/Highlights command on a Smart Object layer it is possible to bring the effect of tone down to the overexposed photo. This three-step technique for reducing the highlights and improving an overexposed photo is so easy that it is always worth testing before spending time with other methods or discarding the photo.
Let check out how to do it . . .
1. Open an overexposed photo.
2. Click Filter -> Convert for Smart Filters.
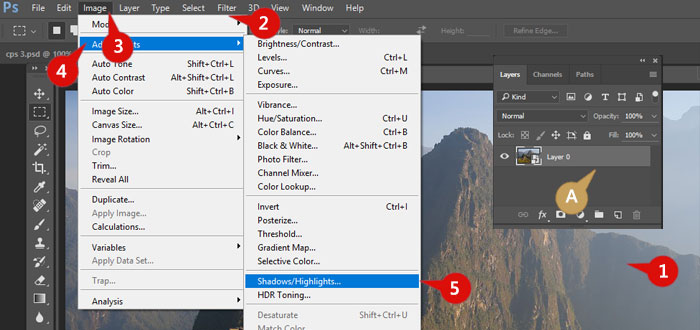
A The Background layer is converted to a Smart Object layer.
3. Click Image.
4. Click Adjustments.
5. Click Shadows/Highlights. The Shadows/Highlights dialog box appears.
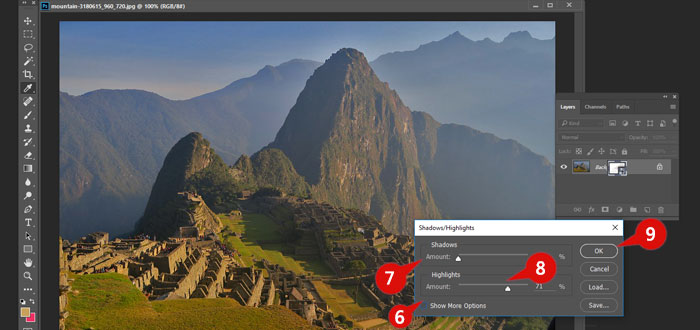
6. Click Preview (changes ![]() to
to ![]() )
)
7. Click and drag the Shadows Amount slider to the left to 0%.
8. Click and drag the Highlights Amount slider to the right until the image looks the way you want.
9. Click OK. The image exposure is improved.
Read some more interesting stuffs on Overexposed:
How to Fix an Overexposed Photo in Lightroom
Photography: An Introduction to Exposure
Underexposed vs Overexposed Photos: Which is Worse?