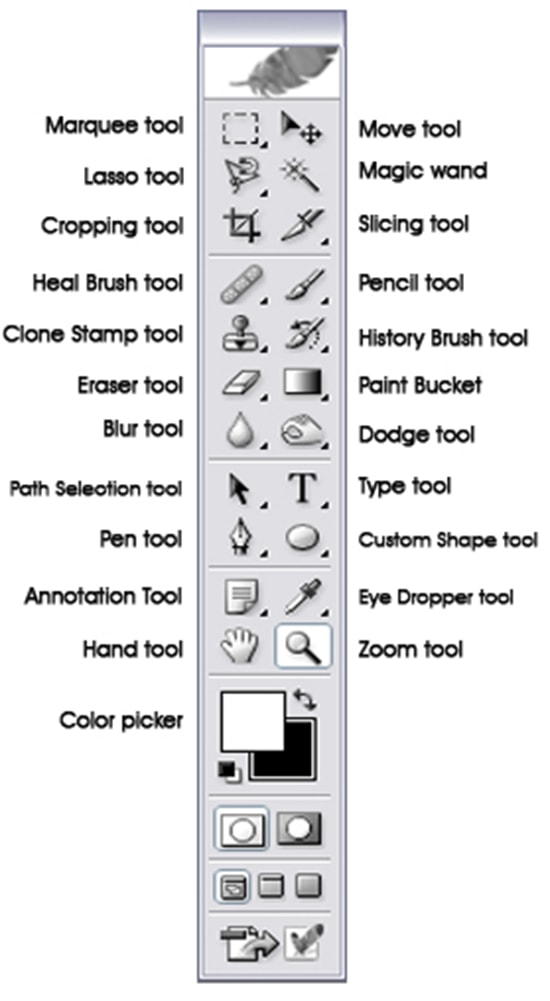
Introducing Photoshop Toolbar
In this tutorial, we will give you a quick introduction to the Photoshop toolbar. You need to know these toolbar so that you know how to photo edit. All the tools in the toolbar have shortcuts assigned to them. The shortcut is given on the right of the tool name.
Photo Courtesy – Photoshop Toolbar
Move Tool
Move tool is used for moving pixels on the screen. You can move text, layer masks, normal layers, selected areas. The shortcut for this tool is V.
Rectangular Marquee Tool & Elliptical Marquee Tool
The Rectangular Marquee Tool is used for making rectangular selections and the Elliptical Marquee tool is used for making elliptical selections. The shortcut for this tool is M.
Lasso Tool, Polygonal Lasso Tool and Magnetic Lasso Tool
The Lasso Tool is used for making freehand selections. The Polygonal Lasso tool is a bit more precise, allowing you to create a selections formed by straight lines. The Magnetic Lasso Tool has the most precision of all the tools in the group. This is a recommended tool for beginners. The shortcut for lasso tool is L.
Quick Selection Tool and Magic Wand Tool
Quick Selection tool has the advantage of being, as the name suggests, quick. If you start painting with this brush inside of an object, you will quickly select it. The shortcut for this tool is W. The Magic Wand Tool is a nice little tool that has its uses from time to time as well.
Crop Tool, Slice Tool and Slice Select Tool
The Crop Tool allows you to crop your images to the desired size. Click, drag and press Enter to crop your image. The cropping is best done at the end of the editing process. The Slice Tool and Slice Select Tool are mainly for Web Designers and have very few uses for regular uses.
Eyedropper Tool, Color Sampler Tool
If you are doing color correction in an image, the Eyedropper Tool is your best choice. Set the Sample Size in the option bar first and then hold Shift and left click while using the Eyedropper tool to access the Color Sampler Tool and create a new color sampler.
Spot Healing Brush Tool, Healing Brush Tool, Patch Tool, Red Eye Tool
These tools are very important if you are doing a lot of facial retouching. The Spot Healing Brush Tool is the easiest to use. You simply find the skin imperfection you want to remove and click on it. The Healing Brush Tool is the same as the Spot Healing Brush Tool except it requires you to set a sample point. The Patch Tool is very useful for seamless blending of skin. The Red Eye Tool requires you to select an iris with a red eye problem and it attempts to remove the redness in the pupil.
Brush Tool, Pencil Tool, Color Replacement Tool
The Brush tool is probably the most used tool in the Toolbar panel. You can use it to paint with pixels over your image. The shortcut for this tool is the bracket keys. Clicking the left bracket key decreases the size of the brush while the right bracket key increases the size. Holding Shift while pressing the bracket keys allows you to increase/decrease the hardness of the brush. The Pencil Tool is basically a downgraded version of the Brush tool. The Color Replacement Tool allows you to replace one color with another.
Clone Stamp Tool
The Clone Stamp Tool has a lot of uses and if you are doing photo manipulations, this is a tool you should use. It clones areas from one part of the image in other parts. It is very useful for creating new content based on an existing one and removing skin imperfections or undesired objects.
History Brush Tool
The History Brush Tool allows you to paint on a new layer from a previous state of your image. This is an important tool but it all depends on your workflow.
Eraser Tool, Background Eraser Tool, Magic Eraser Tool
The Eraser Tool allows you to delete pixels from a pixel layer or a layer mask. The Background Eraser Tool is like the Color Replacement Tool but instead of replacing the color, you erase it. The Magic Eraser Tool looks and acts a lot like the Magic Wand Tool but instead of selecting pixels, it deletes them.
Gradient Tool & Paint Bucket Tool
If you click with Paint Bucket Tool on a picture, it will fill the area with the foreground color. The Gradient Tool allows you to create a gradient from the background and foreground colors. The shortcut key for this tool is G.
Blur Tool & Sharpen Tool
The Blur Tool and the Sharpen tool both do one thing in common which is – they blur and sharpen respectively.
Dodge Tool & Burn Tool
Dodge Tool lightens and Burn Tool darkens while in the same time increasing contrast. Both tools are very useful in Photoshop.
Pen Tool
The Pen Tool allows you to create vector shapes as well as make selections. It is really helpful for clipping path.
Horizontal Type Tool & Vertical Type Tool
Horizontal and Vertical Type tools allow you to add text to your images. With one of these two tools selected, simply click anywhere in your document and start typing. You can change the font, size and other settings in the Options Panel.
Path Selection Tool, Direct Selection Tool
These tools are designed to manipulate and select paths. If you click with the Path Selection Tool on a path, you will select the entire path whereas if you click with the Direct Selection Tool on a path, you will select only a point or a handle bar.
Hand Tool, Rotate View Tool
If you are zoomed into a document, the Hand Tool allows you to drag the document.
Zoom Tool
The Zoom Tool allows you to zoom into a document. Click to zoom in, Alt-click to zoom out.

The most powerful tool to help you creating great textures in Photoshop is the filter feature. It is easy and with a few adjustments, you can create tons of different and unique textures. Double click … Continue reading How to Create a Gold Texture in Photoshop
Read More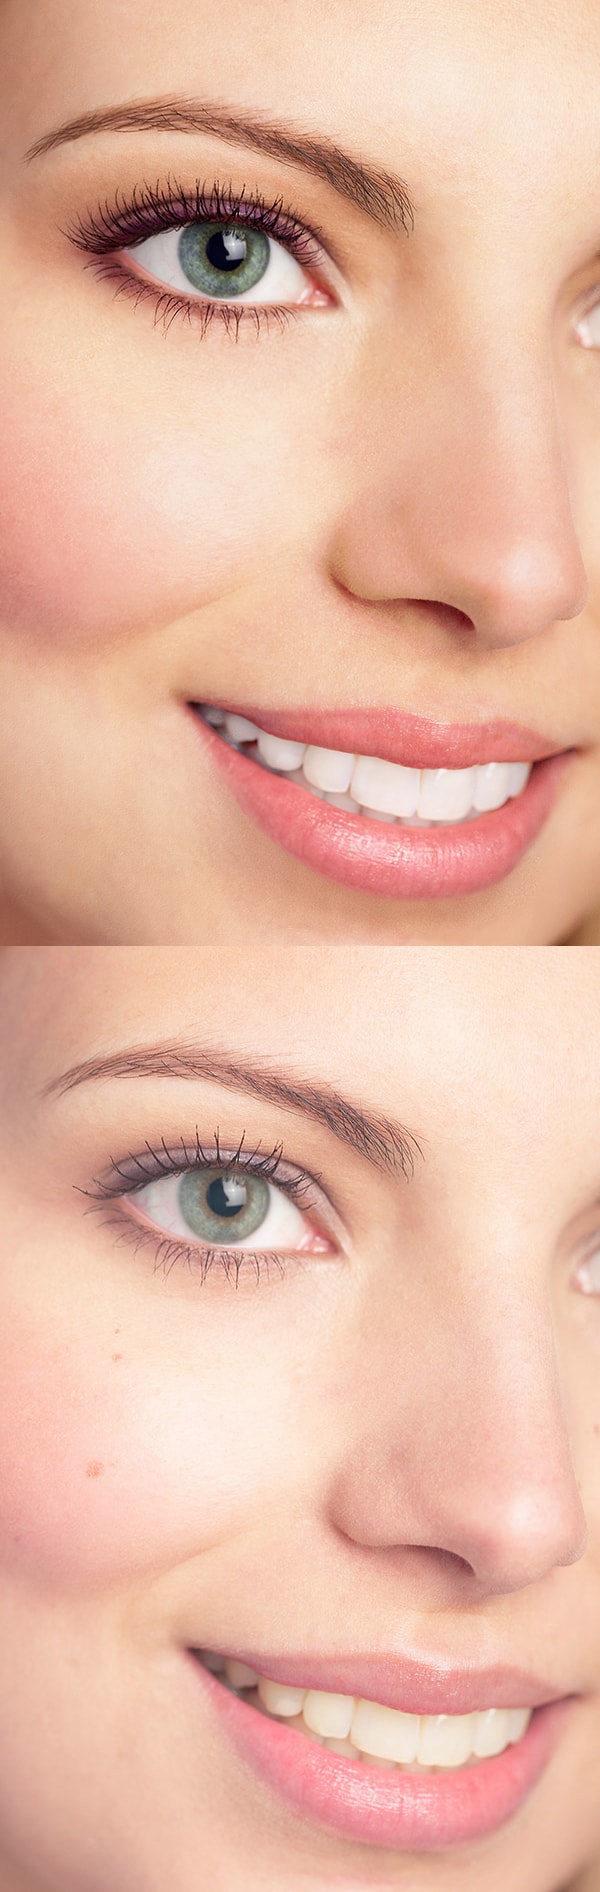
Any retouching images will be good if you are able to keep people looking natural. However, only looking natural does not mean you do not use any effects in it. In addition, it looks good … Continue reading Natural Looking Retouch in General
Read More