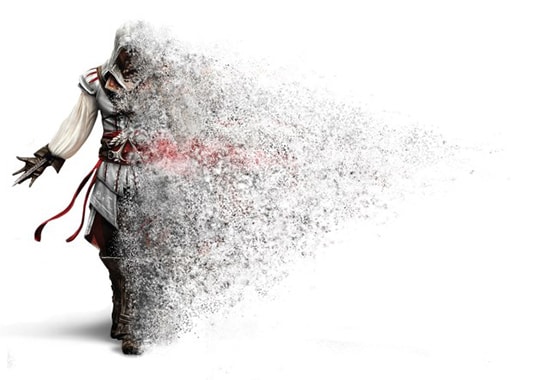
How to Make Disintegration Effect in Photoshop
Here, you will learn on how to create disintegration effect with photo edit in Photoshop. I hope it will help you both beginner and advanced level of students in a great deal.
Photo Courtesy – https://bradleytyler1993.wordpress.com/
At first, open an image which will be the background layer. Use ‘Quick Selection Tool’ to select the photo subject. Set the tool to ‘Subtract from Selection’ to remove unwanted selection. Right-click and select ‘Refine Edge.’ Use the tool along the edges of the picture to improve the selection. Right-click and select ‘Layer-via Copy.’ Right click on the new layer and choose duplicate layer. Then, delete the background layer. Create a new layer and move it below all the layers and lastly fill it with color. In order to create space, hold CTRL key to select the two layers of the photo and move them together. Select the first photo layer and go to Filter> Liquify. Use the ‘Forward Warp Tool’ to extend the edges of the photo. This will determine the distance up to which one can disperse the fragments of the picture. Add a layer mask to the first photo and fill it with black color. The black color will hide the photo. Add a layer mask to the second photo but fill it with white color this time. Before starting to use the brush, make sure to select the ‘white mask’ and not the photo. Now, use the weirdest brushes to fragment the edges of the second photo using the black color. The choice of the brush will give you different result each time you applied. Select the ‘white mask’ and use the white color to pop up the fragments of the first photo. Decrease the opacity of the brush to create a fading effect. Lastly, you can use the black color on the black mask to soften the edges. This will sum up the whole process.
I hope that it will help you and from now on, hopefully you will follow this procedure more often in Photoshop and be an expert in this field in the future.
Photo retouching is widely and commonly used in fashion industry. Retouching is used mostly concentrating on mainly the fashion industry and the models along with popular celebrities across the whole world. Fashion retouch Hence, by … Continue reading Basic of ‘Fashion Retouching’
Read More
Smart objects are special type of layers. They can be resized, rotated back and forth without ever losing quality on the way. That is already a huge advantage but there are so many other reasons … Continue reading Photoshop’s Smart Objects for a non-destructive workflow
Read More